
Google Colab使用
Google colab(Colaboratory)在编辑时候和jupyter notebook类似,并且提供免费的GPU以供使用,这对于需要处理大量数据运算的机器项目来说再合适不过了。挺香的
新建一个笔记本(.ipynb)后,选择"修改->笔记本设置->硬件加速器->GPU"就可以想要用英伟达Tesla K80 GPU啦(2599美元一块)
colab中文件交互
文档里提供了四种方式,分别是:
- 从本地直接上传
- 连接Google Drive
- 连接Google Sheet
- 连接Google Cloud Storage
与本地文件交互
本地文件上传
files.upload() 返回一个由我们上传的所有文件构成的一个字典。 这个字典的key是文件名, 这个字典的value是我们上传的文件的data。
1 | from google.colab import files |
从colab下载文件到本地
1 | from google.colab import files |
连接Google Drive
PyDrive
这里官方有提供了许多种方法。这里我就挑一种介绍了,有兴趣的可以点进这个Colab官方文档进去看。
这里只介绍使用PyDrive的方法。PyDrive是google-api-python-client的包装库,简化了许多常见的Google Drive API任务。
1 | !pip install -U -q PyDrive |
Mounting Google Drive locally
首先把整个项目工程上传到 Google Drive 中,然后在该项目文件夹下(执行的主函数文件同一目录)新建一个 run.ipynb。新建方法与之前一样,在项目文件夹中 右键-更多-Colaboratory。
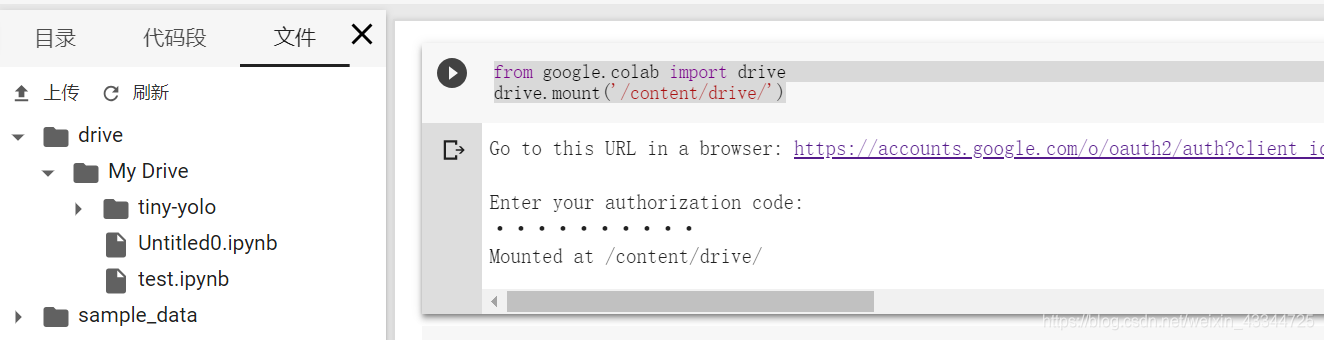
然后,在新建的笔记本中挂载 Google Drive:
1 | from google.colab import drive |
执行以上语句后,会出现一个链接。点击链接,获取并键入 authorization code,回车,等待圈圈转完就能在左侧刷新,看到挂载的Drive
挂载 Drive 网上还有另一种方法,语句很多很复杂,但这个好像没啥区别。。
对于这个服务器而言,整体目录结构是这样的:
顶级目录为 content,我们进入笔记本后无论笔记本在哪,当前工作目录都是 /content。/content下默认有 sample_data 目录,其中包括运行示例程序的一些必要数据文件。我们的 Google Drive 作为一个 My Drive 文件夹挂载在 /content/drive 文件夹下。我的项目是“我的云端硬盘”里的一个tiny-yolo文件夹,因此我的项目的路径应该为 /content/drive/My Drive/tiny-yolo。这里大家试一试就明白了,比我说啥都快。
注意事项
- 为了保证资源的合理分配,google 会按照一定机制将服务器回收:它会一定时间后自动回收已连接但闲置的服务器,和有运行代码但未连接的服务器。所以想挂机跑代码,要保证与服务器保持连接(不掉线),否则一早起来可能就会发现它被悄悄的回收了。稍微掉线个几分钟就连回去是没什么问题的。
- 在回收服务器后,写到 My Drive 以外其他文件夹下的文件都将被删除,下次再连接就是一台崭新的服务器了。
- 挂载 Drive 后再向 Google Drive上传文件,同步到 notebook 那边会有一定的延迟,大概等个几秒钟到半分钟不等,多刷新几下就会出现了。删除文件也是。然而在删除 a.py 后,如果没等 notebook 那边反应过来就重新再传一个 a.py,notebook 那边很可能就出现一个被重命名的文件 a(1).py。。难道是我姿势不对??
- 有一次我上传近 3000 张图片作为训练集到 Drive,上传成功,但是 notebook 没读全,!ls “/content/drive/My Drive/tiny-yolo/data” | wc -l 看一眼花式少文件,我也不知道为啥。。总是迷之过会 (hen) 儿 (jiu) 就好了。。搞得我也是很醉。
连接Google Sheet
连接Google Cloud Storage
Author: Mrli
Link: https://nymrli.top/2019/05/27/Google-Colab使用/
Copyright: All articles in this blog are licensed under CC BY-NC-SA 3.0 unless stating additionally.