Mrli
别装作很努力,
因为结局不会陪你演戏。
Contacts:
QQ博客园

2019_6月编程笔记

2019/11/26 编程日记
Word count: 5,806 | Reading time: 27min

2019_6月编程笔记

注,不少内容比较多,已单独分出去成为独立的文章,更详细的介绍可见这些文章

硬盘格式

fat32 单文件4G, 做引导分区

系统引导程序能读fat32

只能主引导记录,选择能找到efi程序

exfat 支持更大空间,引导识别不了,做不了系统盘

Python

all

__all__是一个字符串list;

约束作用:用来定义模块中对于from XXX import *时要对外导出的符号,即要暴露的借口,但它只对import *起作用,对from XXX import XXX不起作用。

from njupt.zhengfang import Zhengfang是在__init__.py里用all标出后在该目录下的其他模块能直接通过from njupt import Zhengfang来调用。修改了导入的方式

eval 和 exec

1.exec能执行多段Python代码,eval只能执行当行

1
2
3
4
5
6
exec("""
print('hello')
print('world')
""")

eval("print('hello')")

2.而Python中的eval函数可以计算Python表达式,并返回结果;(exec不返回结果,print(eval("…"))打印None);

os.environ

1
2
3
4
5
6
7
8
9
10
11
12
13
# 使用os.environ来读取和修改环境变量:
import os

print (os.environ["TEMP"])

mydir = "c://mydir"
os.environ["MYDIR"] = mydir
print (os.environ["MYDIR"])

pathV = os.environ["PATH"]
print (pathV)
os.environ["PATH"]= mydir + ";" + os.environ["PATH"]
print (os.environ["PATH"])

sys.path的insert和append

python程序中使用 import XXX 时,python解析器会在当前目录、已安装和第三方模块中搜索 xxx,如果都搜索不到就会报错。

使用sys.path.append()方法可以临时添加搜索路径,方便更简洁的import其他包和模块。这种方法导入的路径会在python程序退出后失效。

1.对于模块和自己写的脚本不在同一个目录下,在脚本开头加

1
2
import sys  
sys.path.append(’引用模块的地址')

2.把路径添加到系统的环境变量,或把该路径的文件夹放进已经添加到系统环境变量的路径内。环境变量的内容会自动添加到模块搜索路径中。

insert:定义搜索优先顺序

1
2
import sys
sys.path.insert(1, "./model")

sys.path.insert(1, "./crnn")定义搜索路径的优先顺序,序号从0开始,表示最大优先级,sys.path.insert()加入的也是临时搜索路径,程序退出后失效。

sphinx使用

pip install sphinx

1.新建docs文件夹

2.sphinx-quickstart

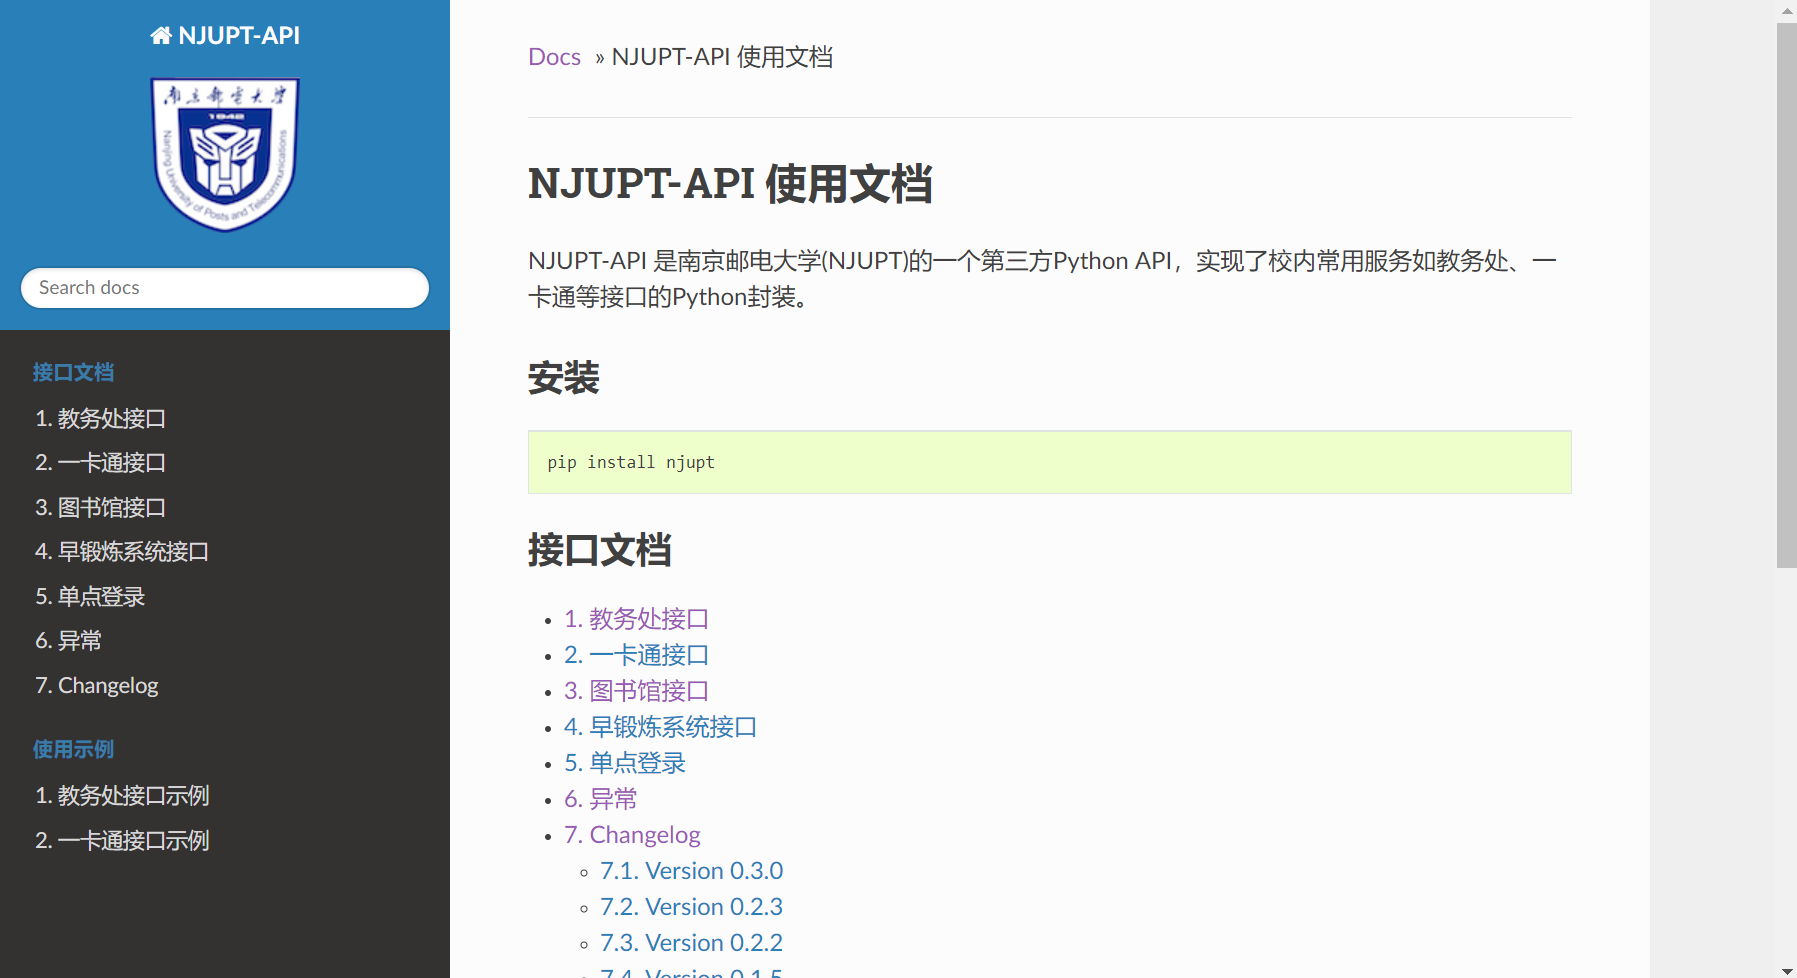
3.配置

教程说明:

1
2
3
4
5
6
7
8
9
10
11
12
13
14
15
16
17
18
19
20
21
22
> Root path for the documentation [.]: doc  # 在当前目录下新建doc文件夹存放sphinx相关信息
> Separate source and build directories (y/n) [n]: # 默认,直接回车
> Name prefix for templates and static dir [_]:
> Project name: python123 # 输入项目名称
> Author name(s): 123 # 作者
> Project version: 1.0 # 项目版本
> Project release [1.0]:
> Project language [en]: # 默认,回车
> Source file suffix [.rst]:
> Name of your master document (without suffix) [index]:
> Do you want to use the epub builder (y/n) [n]:
> autodoc: automatically insert docstrings from modules (y/n) [n]: y # 这个很重要,输入y
> doctest: automatically test code snippets in doctest blocks (y/n) [n]:
> intersphinx: link between Sphinx documentation of different projects (y/n) [n]:
> todo: write "todo" entries that can be shown or hidden on build (y/n) [n]:
> coverage: checks for documentation coverage (y/n) [n]:
> pngmath: include math, rendered as PNG images (y/n) [n]:
> mathjax: include math, rendered in the browser by MathJax (y/n) [n]:
> ifconfig: conditional inclusion of content based on config values (y/n) [n]:
> viewcode: include links to the source code of documented Python objects (y/n) [n]: y # 很重要,输入y,表示将源码也放到文档中,你看很多python的模块的文档,其实都是包含代码的。
> Create Makefile? (y/n) [y]:
> Create Windows command file? (y/n) [y]:

windows实测:

1
2
3
4
5
6
7
8
9
10
11
12
13
14
15
16
17
18
19
20
21
22
23
24
25
26
27
28
29
30
31
32
33
34
35
36
37
38
(Python_web) E:/Python_web/Code/Quan>sphinx-quickstart

Welcome to the Sphinx 2.1.0 quickstart utility.

Please enter values for the following settings (just press Enter to
accept a default value, if one is given in brackets).

Selected root path: .

You have two options for placing the build directory for Sphinx output.
Either, you use a directory "_build" within the root path, or you separate
"source" and "build" directories within the root path.
> Separate source and build directories (y/n) [n]: n

The project name will occur in several places in the built documentation.
> Project name: TaobaoQuan
> Author name(s): Mrli
> Project release []: 1.0

If the documents are to be written in a language other than English,
you can select a language here by its language code. Sphinx will then
translate text that it generates into that language.

For a list of supported codes, see
http://sphinx-doc.org/config.html#confval-language.
> Project language [en]: en

Creating file ./conf.py.
Creating file ./index.rst.
Creating file ./Makefile.
Creating file ./make.bat.

Finished: An initial directory structure has been created.

You should now populate your master file ./index.rst and create other documentation
source files. Use the Makefile to build the docs, like so:
make builder
where "builder" is one of the supported builders, e.g. html, latex or linkcheck.

编写好目录下的所有.rst(默认生成了模板index.rst)文件后./make.bat html可以生成网页目录

conf.py默认模板

1
2
3
4
5
6
7
8
9
10
11
12
13
14
15
16
17
18
19
20
21
22
23
24
25
26
27
28
29
30
31
32
33
34
35
36
37
38
39
40
41
42
43
44
45
46
47
48
49
50
51
52
53
54
55
# Configuration file for the Sphinx documentation builder.
#
# This file only contains a selection of the most common options. For a full
# list see the documentation:
# http://www.sphinx-doc.org/en/master/config

# -- Path setup --------------------------------------------------------------

# If extensions (or modules to document with autodoc) are in another directory,
# add these directories to sys.path here. If the directory is relative to the
# documentation root, use os.path.abspath to make it absolute, like shown here.
#
# import os
# import sys
# sys.path.insert(0, os.path.abspath('.'))


# -- Project information -----------------------------------------------------

project = 'TaobaoQuan'
copyright = '2019, Mrli'
author = 'Mrli'

# The full version, including alpha/beta/rc tags
release = '1.0'


# -- General configuration ---------------------------------------------------

# Add any Sphinx extension module names here, as strings. They can be
# extensions coming with Sphinx (named 'sphinx.ext.*') or your custom
# ones.
extensions = [
]

# Add any paths that contain templates here, relative to this directory.
templates_path = ['_templates']

# List of patterns, relative to source directory, that match files and
# directories to ignore when looking for source files.
# This pattern also affects html_static_path and html_extra_path.
exclude_patterns = ['_build', 'Thumbs.db', '.DS_Store']


# -- Options for HTML output -------------------------------------------------

# The theme to use for HTML and HTML Help pages. See the documentation for
# a list of builtin themes.
#
html_theme = 'alabaster'

# Add any paths that contain custom static files (such as style sheets) here,
# relative to this directory. They are copied after the builtin static files,
# so a file named "default.css" will overwrite the builtin "default.css".
html_static_path = ['_static']

default

Gaoliang模板

1
2
3
4
5
6
7
8
9
10
11
12
13
14
15
16
17
18
19
20
21
22
23
24
25
26
27
28
29
30
31
32
33
34
35
36
37
38
39
40
41
42
43
44
45
46
47
48
49
50
51
52
53
54
55
56
57
58
59
60
61
62
63
64
65
66
67
68
69
70
71
72
73
74
75
76
77
78
79
80
81
82
83
84
85
86
87
88
89
90
91
92
93
94
95
96
97
98
99
100
101
102
103
104
105
106
107
108
109
110
111
112
113
114
115
116
117
118
119
120
121
122
123
124
125
126
127
128
129
130
131
132
133
134
135
136
137
138
139
140
141
142
143
144
145
146
147
148
149
150
151
152
153
154
155
156
157
158
159
160
161
# -*- coding: utf-8 -*-
#
# Configuration file for the Sphinx documentation builder.
#
# This file does only contain a selection of the most common options. For a
# full list see the documentation:
# http://www.sphinx-doc.org/en/master/config

# -- Path setup --------------------------------------------------------------

# If extensions (or modules to document with autodoc) are in another directory,
# add these directories to sys.path here. If the directory is relative to the
# documentation root, use os.path.abspath to make it absolute, like shown here.
#
import os
import sys

# sys.path.insert(0, os.path.abspath('.'))

# Insert NJUPT-API' path into the system.
sys.path.insert(0, os.path.abspath('..'))

# -- Project information -----------------------------------------------------

project = '...'
copyright = '...'
author = '...'

# The short X.Y version
version = ''
# The full version, including alpha/beta/rc tags
release = ''

# -- General configuration ---------------------------------------------------

# If your documentation needs a minimal Sphinx version, state it here.
#
# needs_sphinx = '1.0'

# Add any Sphinx extension module names here, as strings. They can be
# extensions coming with Sphinx (named 'sphinx.ext.*') or your custom
# ones.
extensions = [
'sphinx.ext.autodoc',
]

html_logo = "_static/logo_tiny.png"

# Add any paths that contain templates here, relative to this directory.
templates_path = ['_templates']

# The suffix(es) of source filenames.
# You can specify multiple suffix as a list of string:
#
# source_suffix = ['.rst', '.md']
source_suffix = '.rst'

# The master toctree document.
master_doc = 'index'

# The language for content autogenerated by Sphinx. Refer to documentation
# for a list of supported languages.
#
# This is also used if you do content translation via gettext catalogs.
# Usually you set "language" from the command line for these cases.
language = 'zh_CN'

# List of patterns, relative to source directory, that match files and
# directories to ignore when looking for source files.
# This pattern also affects html_static_path and html_extra_path .
exclude_patterns = ['_build', 'Thumbs.db', '.DS_Store']

# The name of the Pygments (syntax highlighting) style to use.
pygments_style = 'sphinx'

# -- Options for HTML output -------------------------------------------------

# The theme to use for HTML and HTML Help pages. See the documentation for
# a list of builtin themes.
#
# html_theme = 'sphinx_rtd_theme'
# html_theme = 'alabaster'
# html_theme = 'flask'

# Theme options are theme-specific and customize the look and feel of a theme
# further. For a list of options available for each theme, see the
# documentation.
#
html_theme_options = {
# 'show_powered_by': False,
}

# Add any paths that contain custom static files (such as style sheets) here,
# relative to this directory. They are copied after the builtin static files,
# so a file named "default.css" will overwrite the builtin "default.css".
html_static_path = ['_static']

# Custom sidebar templates, must be a dictionary that maps document names
# to template names.
#
# The default sidebars (for documents that don't match any pattern) are
# defined by theme itself. Builtin themes are using these templates by
# default: ``['localtoc.html', 'relations.html', 'sourcelink.html',
# 'searchbox.html']``.
#
html_show_sourcelink = False

# -- Options for HTMLHelp output ---------------------------------------------

# Output file base name for HTML help builder.
htmlhelp_basename = 'NJUPT-APIdoc'

# -- Options for LaTeX output ------------------------------------------------

latex_elements = {
# The paper size ('letterpaper' or 'a4paper').
#
# 'papersize': 'letterpaper',

# The font size ('10pt', '11pt' or '12pt').
#
# 'pointsize': '10pt',

# Additional stuff for the LaTeX preamble.
#
# 'preamble': '',

# Latex figure (float) alignment
#
# 'figure_align': 'htbp',
}

# Grouping the document tree into LaTeX files. List of tuples
# (source start file, target name, title,
# author, documentclass [howto, manual, or own class]).
latex_documents = [
(master_doc, 'NJUPT-API.tex', 'NJUPT-API Documentation',
'gaoliang', 'manual'),
]

# -- Options for manual page output ------------------------------------------

# One entry per manual page. List of tuples
# (source start file, name, description, authors, manual section).
man_pages = [
(master_doc, 'njupt-api', 'NJUPT-API Documentation',
[author], 1)
]

# -- Options for Texinfo output ----------------------------------------------

# Grouping the document tree into Texinfo files. List of tuples
# (source start file, target name, title, author,
# dir menu entry, description, category)
texinfo_documents = [
(master_doc, 'NJUPT-API', 'NJUPT-API Documentation',
author, 'NJUPT-API', 'One line description of project.',
'Miscellaneous'),
]

# -- Extension configuration -------------------------------------------------

sphinx_rtd_theme风格

python代码docstring生成文档之sphinx

Python 验证码识别

通过pytesseracthttps://blog.csdn.net/weixin_42812527/article/details/81264189

windows10安装使用pytesseract坑:https://blog.csdn.net/weixin_42812527/article/details/81908674

1
2
3
4
5
6
7
8
9
10
11
12
13
14
15
16
17
18
19
20
21
22
23
24
# coding=utf-8
import requests
import pytesseract
from PIL import Image
from io import BytesIO


captcha_url = 'http://182.92.169.64:8088/808gps/rand.action'
captcha_content = requests.get(url=captcha_url)
# 获得图片的二进制内容
captcha_content = captcha_content.content
# 用BytesIO读取图片
image = Image.open(BytesIO(captcha_content))
# 转化为灰度图
imgry = image.convert('L')
# 二值化处理
table = [0 if i < 140 else 1 for i in range(256)]
# 使字体更加突出的显示
out = imgry.point(table,'1')
# out.show()
captcha = pytesseract.image_to_string(out)
captcha = captcha.strip()
captcha = captcha.upper()
print (captcha)

Python异常

Python所有的错误都是从BaseException类派生的,常见的错误类型和继承关系

1
2
3
4
5
6
7
8
9
10
11
12
13
14
15
16
17
18
19
20
21
22
23
24
25
26
27
28
29
30
31
32
33
34
35
36
37
38
39
40
41
42
43
44
45
46
47
48
49
50
BaseException
+-- SystemExit
+-- KeyboardInterrupt
+-- GeneratorExit
+-- Exception
+-- StopIteration
+-- StandardError
| +-- BufferError
| +-- ArithmeticError
| | +-- FloatingPointError
| | +-- OverflowError
| | +-- ZeroDivisionError
| +-- AssertionError
| +-- AttributeError
| +-- EnvironmentError
| | +-- IOError
| | +-- OSError
| | +-- WindowsError (Windows)
| | +-- VMSError (VMS)
| +-- EOFError
| +-- ImportError
| +-- LookupError
| | +-- IndexError
| | +-- KeyError
| +-- MemoryError
| +-- NameError
| | +-- UnboundLocalError
| +-- ReferenceError
| +-- RuntimeError
| | +-- NotImplementedError
| +-- SyntaxError
| | +-- IndentationError
| | +-- TabError
| +-- SystemError
| +-- TypeError
| +-- ValueError
| +-- UnicodeError
| +-- UnicodeDecodeError
| +-- UnicodeEncodeError
| +-- UnicodeTranslateError
+-- Warning
+-- DeprecationWarning
+-- PendingDeprecationWarning
+-- RuntimeWarning
+-- SyntaxWarning
+-- UserWarning
+-- FutureWarning
+-- ImportWarning
+-- UnicodeWarning
+-- BytesWarning

java异常

继承、Super

super() 函数是用于调用父类(超类)的一个方法,只有在新式类中可以使用

super 是用来解决多重继承问题的,直接用类名调用父类方法在使用单继承的时候没问题,但是如果使用多继承,会涉及到查找顺序(MRO,Method Resolution Order,采用广度优先(区别于深度优先)的规则定义)、重复调用(钻石继承)等种种问题。

MRO 就是类的方法解析顺序表, 其实也就是继承父类方法时的顺序表。

语法

以下是 super() 方法的语法:

1
2
3
4
# 菜鸟教程
super(type [, object-or-type])
# 个人理解
super( ThisClass [, object(self)])

参数

  • type – 类(type),通常是当前子类。
  • object-or-type – 类实例,一般是 self

含义

self这个实例对象去查找ThisClass类的父类拥有的属性(成员方法、数据成员)

▲. Python3.x 和 Python2.x 的一个区别是: Python 3 可以使用直接使用 super().xxx 代替 super(Class, self).xxx :

即平时写的

1
2
3
4
5
6
7
class TestClass(object):
def __init__(self, *arg, **kwarg):
super(TestClass, self).__init__() # 此时init里不用self
# 等价于 super().__init__() , 含义是用父类的构造函数初始化某些变量
# 相当于旧式类的 object.__init__(self) # 需要传参self
self.arg = arg
self.kwarg = kwarg

完整代码

1
2
3
4
5
6
7
8
9
10
11
12
13
14
15
16
class clsSuper(object):
age = 18

def __init__(self, name):
print(name)


class clsSub(clsSuper):
def __init__(self):
print(super().age)
# 当只是单继承的时候可以直接使用 print(clsSuper.age),


if __name__ == '__main__':
a = clsSuper('cl')
b = clsSub()

特点

  • super().func()是不用传参self
  • super(type, obj).func()函数调用的是obj实例在MRO中下一个父类的可调用func(),而不是type的父类中的func()。即调用最近的可用func()
  • 使用super()不用指定父类的名称,便于修改维护;同时当继承多个类A、B的时候,用super().__init__()相当于调用多个类的A.__ini__(self)B.__ini__(self)

与java对比

  1. Python中子类不会默认调用父类的构造函数,即下面代码。并不会要要求给传name。当然也可以理解为跟java一样调用了一个全空、没有任何内容的构造函数,但是在python中不需要显性写出来,原因部分是特点2(java中存在有参数的构造函数时,必须将空参数的构造函数显式写出,不然子类默认隐式调用空参数的构造函数时会报错说不存在)。
  2. Python中的构造函数只有一个。但由于存在*arg,**kwarg的存在,所以只要执行类型检查执行不同的代码;即实现了多个构造函数
  3. Python的类可以多继承,java只能单继承。
1
2
3
4
5
6
7
8
9
10
11
12
13
14
15
class clsSuper(object):
age = 18

def __init__(self, name):
self.name = name
print(self.name)


class clsSub(clsSuper):
def __init__(self, age):
print(age)


if __name__ == '__main__':
b = clsSub(18)

Cmder Windows 下的终端神器

视频字幕制作

arctime国人自制的免费软件。自动打轴和语音识别功能积分使用注册绑定任务、签到白嫖能鸽很久。

制作完成后保存工程文件,ass,软件->导出,可以导出一份srt字母文件,可以直接上传到B站当CC字幕使用

Pr自带工具一句一句打===>ps批量制作字幕图层===>arctime

mitmProxy手机抓包软件

Q:为什么好多加密算法都要用到异或?

A:位操作 cpu运行非常快

加密的源是形形色色的,其加密结果也要求是尽量差异化。在二元的位运算符中,也就只有"位与"、“位或”、"异或"三种。一个加密过程往往需要经过若干次运算,若采用"位与"运算,竟多次计算的话,其结果值将趋向于比特位全部是0;同样,采用"位或"的话,其结果值将趋向于比特位全部是1。剩下的只有采用"异或"运算了

测试注解的正确性

注解仅仅起到了注释的作用,不会影响代码的执行,所以即使你类型注解写错了,程序运行的时候还是会按照正确的类型去运行。
Python提供了一个工具方便我们测试代码里的类型注解正确性mypy

首先安装:pip install mypy

使用测试:mypy filename.py

Python3.7新特性dataclass

写法对比

1
2
3
4
5
6
7
8
9
10
11
12
13
14
class student(object):
"""docstring for student"""
def __init__(self, name, age):
super(student, self).__init__()
self.name = name
self.age = age


from dataclasses import dataclass
@dataclass
class student(object):
"""docstring for ClassName"""
name: str
age: int

功能对比

  • 传统的class写法的__eq__并不认为两个实例相同,即存储数据不同

    • 1
      2
      3
      4
      5
      6
      7
      8
      9
      10
      11
      12
      13
      14
      15
      16
      17
      18
      19
      20
      21
      22
      23
      24
      25
      26
      27
      28
      29
      30
      31
      class student(object):
      """docstring for student"""
      def __init__(self, name, age):
      super(student, self).__init__()
      self.name = name
      self.age = age


      s1 = student('cl', 18)
      s2 = student('cl', 18)
      print(s1 == s2)
      # >>> False

      #数据的角度来讲,这两个实例代表的是同一个Student,理应相等。所以我们可以重写内置的__eq__方法如下
      class student(object):
      """docstring for student"""
      def __init__(self, name, age):
      super(student, self).__init__()
      self.name = name
      self.age = age

      def __eq__(self, other):
      if self.__class__ is not other.__class__:
      return False
      return (self.name, self.age) == (other.name, other.age)


      s1 = student('cl', 18)
      s2 = student('cl', 18)
      print(s1 == s2)
      # >>> True

注意:

name和age并不是Class Attribute,也就是不能通过NewStudent.name和NewStudent.age直接访问,大家可以通过dir(NewStudent)验证一下。

name和age后面的类型指定并没有实际的效果,也就是如果我们实例化传入错误的数据类型,不会报错,比如 s3 = NewStudent(‘Mark’, ‘20’)

更多功能

通过使用装饰器的选项,可以为用例进一步定制 data class,默认选项是:

1
@dataclass(init=True, repr=True, eq=True, order=False, unsafe_hash=False, frozen=False)
  • init决定是否生成__init__ dunder 方法
  • repr决定是否生成__repr__ dunder方法
  • eq__eq__ dunder 方法也是如此,它决定相等性检查的行为(your_class_instance == another_instance)
  • order 实际上创建了四种 dunder 方法,它们确定所有检查小于and/or大于的行为,如果将其设置为 true,则可以对对象列表进行排序。

最后两个选项确定对象是否可以被哈希化,如果你想使用你的 class 的对象作为字典键的话,这是必要的。

链接:https://www.jianshu.com/p/bea5c202cf85

协程

不是进程,也不是线程,是用户空间调度的完成并发处理的方式。是在用户空间内部完成的。线程和进程是操作系统内完成的。

Github感谢贡献者

1
<a href="https://github.com/spencerwooo/dowww/graphs/contributors"><img src="https://opencollective.com/dowww/contributors.svg?button=false" /></a>

java

equals 和 ==

== : 它的作用是判断两个对象的地址是不是相等。即,判断两个对象是不是同一个对象(基本数据类型比较的是值,引用数据类型比较的是内存地址)。

equals() : 它的作用也是判断两个对象是否相等。但它一般有两种使用情况:

  • 情况1:类没有覆盖 equals() 方法。
    • 即通过 equals() 比较该类的两个对象时,等价于通过“==”比较这两个对象。
  • 情况2:类覆盖了 equals() 方法。
    • 一般,我们都覆盖 equals() 方法来比较两个对象的内容是否相等;若它们的内容相等,则返回 true (即,认为这两个对象相等)。

说明:

  • String 中的 equals 方法是被重写过的,因为 object 的 equals 方法是比较的对象的内存地址(即==),而 String 的 equals 方法比较的是对象的值。
  • 当创建 String 类型的对象时,虚拟机会在常量池中查找有没有已经存在的值和要创建的值相同的对象,如果有就把它赋给当前引用。如果没有就在常量池中重新创建一个 String 对象。

hashCode()介绍

hashCode() 的作用是获取哈希码,也称为散列码;它实际上是返回一个int整数。这个哈希码的作用是确定该对象在哈希表中的索引位置。hashCode() 定义在JDK的Object.java中,这就意味着Java中的任何类都包含有hashCode() 函数。

散列表存储的是键值对(key-value),它的特点是:能根据“键”快速的检索出对应的“值”。这其中就利用到了散列码!(可以快速找到所需要的对象)

为什么要有 hashCode

我们先以“HashSet 如何检查重复”为例子来说明为什么要有 hashCode: 当你把对象加入 HashSet 时,HashSet 会先计算对象的 hashcode 值来判断对象加入的位置,同时也会与其他已经加入的对象的 hashcode 值作比较,如果没有相符的hashcode,HashSet会假设对象没有重复出现。但是如果发现有相同 hashcode 值的对象,这时会调用 equals()方法来检查 hashcode 相等的对象是否真的相同。如果两者相同,HashSet 就不会让其加入操作成功。如果不同的话,就会重新散列到其他位置。(摘自我的Java启蒙书《Head first java》第二版)。这样我们就大大减少了 equals 的次数,相应就大大提高了执行速度。

通过我们可以看出:hashCode() 的作用就是获取哈希码,也称为散列码;它实际上是返回一个int整数。这个哈希码的作用是确定该对象在哈希表中的索引位置。**hashCode()在散列表中才有用,在其它情况下没用。**在散列表中hashCode() 的作用是获取对象的散列码,进而确定该对象在散列表中的位置。

hashCode()与equals()的相关规定

  1. 如果两个对象相等,则hashcode一定也是相同的
  2. 两个对象相等,对两个对象分别调用equals方法都返回true
  3. 两个对象有相同的hashcode值,它们也不一定是相等的
  4. 因此,equals 方法被覆盖过,则 hashCode 方法也必须被覆盖
  5. hashCode() 的默认行为是对堆上的对象产生独特值。如果没有重写 hashCode(),则该 class 的两个对象无论如何都不会相等(即使这两个对象指向相同的数据)==>通过统一哈希值,使两个对象equals时结果返回哈希值一致便输出true

static{}静态代码块与{}非静态代码块、构造方法

类的执行顺序: static{}静态代码块–>{}静态代码块–>构造方法

static{}静态代码块与{}非静态代码块不同点:

  • 静态代码块只在第一次new执行一次,之后不再执行
    • 一般情况下,如果有些代码比如一些项目最常用的变量或对象必须在项目启动的时候就执行的时候,需要使用静态代码块,这种代码是主动执行的。
  • 而非静态代码块在每new一次就执行一次。 非静态代码块可在普通方法中定义(不过作用不大);而静态代码块不行。
    • 如果我们想要设计不需要创建对象就可以调用类中的方法,例如:Arrays类,Character类,String类等,就需要使用静态方法

两者的区别是 静态代码块是自动执行的而静态方法是被调用才执行的.

非静态代码块与构造函数的区别是:

  • 非静态代码块是给所有对象进行统一初始化,而构造函数是对应的对象初始化因为构造函数是可以多个的,运行哪个构造函数就会建立什么样的对象,但无论建立哪个对象,都会先执行相同的构造代码块。也就是说,构造代码块中定义的是不同对象共性的初始化内容。
1
2
3
4
5
6
7
8
9
10
11
12
13
14
15
16
17
18
19
20
21
22
23
24
25
26
27
28
29
30
31
32
package classtest;

public class testClass {
public testClass() {
System.out.print("默认构造方法!--");
}
//非静态代码块
{
System.out.print("非静态代码块!--");
}
// 静态代码块,指挥执行一次
static {
System.out.print("静态代码块!--");
}

public static void test() {
System.out.print("静态方法中的内容! --");
{
System.out.print("静态方法中的代码块!--");
}
}
public static void main(String[] args) {
testClass test = new testClass();
testClass.test();//静态代码块!--非静态代码块!--默认构造方法!--静态方法中的内容! --静态方法中的代码块!--
System.out.println();
testClass test2 = new testClass();
}
}
/**
静态代码块!--非静态代码块!--默认构造方法!--静态方法中的内容! --静态方法中的代码块!--
非静态代码块!--默认构造方法!--
*/

Ansible 运维自动化 ( 配置管理工具 )

Author: Mrli

Link: https://nymrli.top/2019/08/30/2019-6月编程笔记/

Copyright: All articles in this blog are licensed under CC BY-NC-SA 3.0 unless stating additionally.

< PreviousPost
Linux三剑客
NextPost >
Python爬虫常规流程
CATALOG
  1. 1. 2019_6月编程笔记
    1. 1.1. 硬盘格式
    2. 1.2. Python
      1. 1.2.1. all
      2. 1.2.2. eval 和 exec
      3. 1.2.3. os.environ
      4. 1.2.4. sys.path的insert和append
      5. 1.2.5. sphinx使用
        1. 1.2.5.1. conf.py默认模板
        2. 1.2.5.2. Gaoliang模板
      6. 1.2.6. Python 验证码识别
    3. 1.3. Python异常
      1. 1.3.1. java异常
    4. 1.4. 继承、Super
      1. 1.4.1. 特点
    5. 1.5. 与java对比
    6. 1.6. Cmder Windows 下的终端神器
    7. 1.7. 视频字幕制作
    8. 1.8. mitmProxy手机抓包软件
      1. 1.8.1. Q:为什么好多加密算法都要用到异或?
    9. 1.9. 测试注解的正确性
    10. 1.10. 协程
    11. 1.11. Github感谢贡献者
  2. 2. java
    1. 2.1. equals 和 ==
      1. 2.1.1. hashCode()介绍
      2. 2.1.2. 为什么要有 hashCode
      3. 2.1.3. hashCode()与equals()的相关规定
    2. 2.2. static{}静态代码块与{}非静态代码块、构造方法