第一个controller
1 2 3 4 5 6 7 8 9 10 11 12 13 14 15 16 17 18 19 20 21 22 23 24 25 26 27 28 package com.example.demo;import org.springframework.beans.factory.annotation.Value;import org.springframework.web.bind.annotation.GetMapping;import org.springframework.web.bind.annotation.RequestMapping;import org.springframework.web.bind.annotation.RequestMethod;import org.springframework.web.bind.annotation.RestController;@RestController public class HelloController @Value ("${cupsize}" ) private String cupsize; @RequestMapping (value="hello" ,method= RequestMethod.GET) public String say () return cupsize; } }
application.yml
1
2
3
4
5
6
7
8
server: port: 5000 cupsize: B spring.datasource.url: jdbc:mysql://127.0.0.1:3306/ spring.datasource.username: root spring.datasource.password: 123456 spring.datasource.driver-class-name: com.mysql.jdbc
@Controller处理http请求Spring4之后新加的注解,原来返回json
@RestController等价于<==>@Controller+@ResponseBody
@RequestMapping 配置url映射
▲如果没有指定Method那么所有方式都可以
给某个方法指定url路由
@RequestMapping(value={"/hello","/hil"},method=RequestMethod.GET)
给整个class指定路由
1 2 3 4 5 6 7 8 9 10 11 12 13 14 15 16 17 18 19 20 21 22 23 24 25 26 27 package com.example.demo;import org.springframework.beans.factory.annotation.Autowired;import org.springframework.web.bind.annotation.RequestMapping;import org.springframework.web.bind.annotation.RequestMethod;import org.springframework.web.bind.annotation.RestController;@RestController @RequestMapping (value="/hello" )public class HelloController @Autowired private GirlProperties girlProperties; @RequestMapping (value = "/say" , method= RequestMethod.GET) public String say () return girlProperties.getCupSize(); } }
@RequestMapping(value=xxx,method=RequestMethod.GET)等价于XxxMapping
@PathVariable
1 2 3 4 @RequestMapping (value = "/say/{id}" , method= RequestMethod.GET)public String say (@PathVariable("id" ) Integer id) return "id:" + id;}
@RequestParam
1 2 3 4 5 6 7 8 9 10 @RequestMapping (value = "/say" , method= RequestMethod.GET)public String say (@RequestParam("id" ) Integer mid) return "id:" + mid; } @RequestMapping (value = "/say" , method= RequestMethod.GET) public String say (@RequestParam(value="id" , required=false , defaultValue="0" ) Integer mid) return "id:" + mid; }
JPA(Java Persistence APl)定义了一系列对象持久化的标准,目前实现这一规范的产品有Hibernate、TopLink等。
application.yml
1 2 3 4 5 6 7 8 9 10 11 12 spring: profiles: active: dev datasource: driver-class-name: com.mysql.cj.jdbc.Driver url: jdbc:mysql: username: root password: cl123123 jpa: hibernate: ddl-auto: create show-sql: true
1 2 3 4 5 6 7 8 9 10 11 12 13 14 15 16 17 18 19 20 21 22 23 24 25 26 27 28 29 30 31 32 33 34 35 36 37 38 39 40 41 42 43 44 45 46 47 48 49 50 51 52 53 package com.example.demo;import javax.persistence.Entity;import javax.persistence.GeneratedValue;import javax.persistence.Id;@Entity public class Girl @Id @GeneratedValue private Integer id; private String cupSize; private Integer age; public Girl () } public Integer getId () return id; } public void setId (Integer id) this .id = id; } public String getCupSize () return cupSize; } public void setCupSize (String cupSize) this .cupSize = cupSize; } public Integer getAge () return age; } public void setAge (Integer age) this .age = age; } @Override public String toString () return "{\"id\":\"" + id + "\",\"cupSize\":\"" + cupSize + "\",\"age\":\"" + age + "\"} " ; } }
GirlControllr.java
1 2 3 4 5 6 7 8 9 10 11 12 13 14 15 16 17 18 19 20 21 22 23 24 25 26 27 28 29 30 31 32 33 34 35 36 37 38 39 40 41 42 43 44 45 46 47 48 49 50 51 52 53 54 55 56 57 58 59 60 61 62 63 64 65 66 67 68 69 70 71 72 package com.example.demo;import java.util.List;import org.springframework.beans.factory.annotation.Autowired;import org.springframework.stereotype.Controller;import org.springframework.web.bind.annotation.DeleteMapping;import org.springframework.web.bind.annotation.GetMapping;import org.springframework.web.bind.annotation.PathVariable;import org.springframework.web.bind.annotation.PostMapping;import org.springframework.web.bind.annotation.PutMapping;import org.springframework.web.bind.annotation.RequestParam;import org.springframework.web.bind.annotation.RestController;@RestController public class GirlController @Autowired private GirlRepository girlRepository; @GetMapping (value= "/girls" ) public List<Girl> girlList () return girlRepository.findAll(); } @PostMapping (value = "/girls" ) public Girl addGirl (@RequestParam("cupSize" ) String cupSize, @RequestParam ("age" ) Integer age) { System.out.println("cupsize" +cupSize); Girl girl= new Girl(); girl.setCupSize(cupSize); girl.setAge(age); return girlRepository.save(girl); } @GetMapping (value="/girls/{id}" ) public Girl girlFindOne (@PathVariable("id" ) Integer id) return girlRepository.findById(id).get(); } @PutMapping (value="/girls/{id}" ) public Girl girlUpdate (@PathVariable("id" ) Integer id, @RequestParam ("cupSize" ) String cupSize, @RequestParam ("age" ) Integer age) { Girl girl = new Girl(); girl.setId(id); girl.setAge(age); girl.setCupSize(cupSize); return girlRepository.save(girl); } @DeleteMapping (value="/girls/{id}" ) public void girlDelete (@PathVariable("id" ) Integer id) girlRepository.deleteById(id); } @GetMapping (value="/girls/age/{age}" ) public List<Girl> girlListByAge (@PathVariable("age" ) Integer age) return girlRepository.findByAge(age); } }
▲注意.视频中的findOne已经被淘汰,因为springboot版本问题,新的版本不再支持findone(id)方法。
可用findById(id).get()或getOne(id)来替换,区别是前者当参数id为空时返回null,后者直接报异常,因为getOne返回的是对象的引用。
我试了下getOne会报错,据说是要设置json的返回格式?
1 2 3 4 5 6 7 8 9 10 11 12 13 14 15 16 17 18 19 package com.example.demo;import java.util.List;import org.springframework.data.jpa.repository.JpaRepository;public interface GirlRepository extends JpaRepository <Girl , Integer > public List<Girl> findByAge (Integer age) }
1 2 3 4 5 6 7 8 9 10 11 12 13 14 15 16 17 18 19 20 21 22 23 24 25 26 27 28 29 30 31 32 33 34 35 36 37 38 39 40 41 42 43 44 45 46 @PostMapping (value = "/girls/two" ) public void girlTwo () girlService.insertTwo(); } package com.example.demo;import org.springframework.beans.factory.annotation.Autowired;import org.springframework.stereotype.Service;import org.springframework.transaction.annotation.Transactional;@Service public class GirlService @Autowired private GirlRepository girlRepository; @Transactional public void insertTwo () Girl girlA = new Girl(); girlA.setCupSize("A" ); girlA.setAge(18 ); girlRepository.save(girlA); Girl girlB = new Girl(); girlB.setCupSize("BBBB" ); girlB.setAge(19 ); girlRepository.save(girlB); } }
在项目开发过程中,使用了Spring data jpa自动创建表。但是默认情况下,创建出来的表类型为MyISAM。
(MySQL数据库默认的存储引擎类型是MyISAM,这种存储引擎类型不支持事务处理。)改成InnoDB存储引擎会就可以了。
1 2 3 4 5 6 jpa: database: MYSQL hibernate: ddl-auto: update show-sql: true database-platform: org.hibernate.dialect.MySQL5InnoDBDialect
在navicat中数据库—>表—>单击表名,在右边可以出现表的所有信息
Spring Boot 2.0深度实践-初遇Spring Boot
多模块:web、persistence、mdel
项目打包——多模块重构后
IDEA: 有图形界面的开发环境
JAR/WAR: 线上、服务器上的生产环境
1 2 3 $ mvn install $ cd target $ java -jar
MAVEN插件: 无图形界面的开发环境
pom.xml中加上依赖:
1 2 3 4 5 <dependency > <groupId > org.springframework.boot</groupId > <artifactId > spring-boot-devtools</artifactId > <optional > true</optional > </dependency >
热部署:
就是容器状态在运行的情况下重新部署整个项目.在这种情况下一般整个内存会清空,重新加载.简单来说就是Tomcat或者其他的web服务器会帮我们重新加载项目.这种方式可能会造成sessin丢失等情况.
热加载:
就是容器状态在运行的情况下重新加载改变编译后的类.在这种情况下内存不会清空,sessin不会丢失,但容易造成内存溢出,或者找不到方法。因为内存无法转变成对像.一般改变类的结构和模型就会有异常,在已经有的变量和方法中改变是不会出问题的
春招上岸了, 准备下后端的相关开发知识
@SpringBootApplication内容->configuration配置相关1 2 3 4 5 6 7 8 9 10 11 12 13 14 15 16 17 @Target ({ElementType.TYPE})@Retention (RetentionPolicy.RUNTIME)@Documented @Inherited @SpringBootConfiguration @EnableAutoConfiguration @ComponentScan ( excludeFilters = {@Filter ( type = FilterType.CUSTOM, classes = {TypeExcludeFilter.class} ), @Filter ( type = FilterType.CUSTOM, classes = {AutoConfigurationExcludeFilter.class} )} )
@EnableAutoConfiguration
1 2 3 4 5 6 7 8 9 10 11 12 13 14 @Target ({ElementType.TYPE})@Retention (RetentionPolicy.RUNTIME)@Documented @Inherited @AutoConfigurationPackage @Import ({AutoConfigurationImportSelector.class}) public @interface EnableAutoConfiguration { String ENABLED_OVERRIDE_PROPERTY = "spring.boot.enableautoconfiguration" ; Class<?>[] exclude() default {}; String[] excludeName() default {}; }
@AutoConfigurationPackage
1 2 3 4 5 6 7 8 9 10 @Target ({ElementType.TYPE})@Retention (RetentionPolicy.RUNTIME)@Documented @Inherited @Import ({Registrar.class}) public @interface AutoConfigurationPackage { String[] basePackages() default {}; Class<?>[] basePackageClasses() default {}; }
1 2 3 4 5 6 7 8 9 10 11 12 13 14 15 16 17 public abstract class AutoConfigurationPackages static class Registrar implements ImportBeanDefinitionRegistrar , DeterminableImports Registrar() { } public void registerBeanDefinitions (AnnotationMetadata metadata, BeanDefinitionRegistry registry) AutoConfigurationPackages.register(registry, (String[])(new AutoConfigurationPackages.PackageImports(metadata)).getPackageNames().toArray(new String[0 ])); } public Set<Object> determineImports (AnnotationMetadata metadata) return Collections.singleton(new AutoConfigurationPackages.PackageImports(metadata)); } } }
主动导入的配置在:External Library-> META-INF/spring.factories->Maven: org.springframework.boot:spring-boot-autoconfigure:2.3.0.RELEASE
1 2 3 4 # Auto Configure org.springframework.boot.autoconfigure.EnableAutoConfiguration=\ org.springframework.boot.autoconfigure.admin.SpringApplicationAdminJmxAutoConfiguration,\ org.springframework.boot.autoconfigure.aop.AopAutoConfiguration,\
随便点一个进去可以看到, 比如redis
1 2 3 4 5 6 7 8 9 10 11 12 13 14 15 16 17 18 @Configuration ( proxyBeanMethods = false ) @ConditionalOnClass ({EnableRedisRepositories.class})@ConditionalOnBean ({RedisConnectionFactory.class})@ConditionalOnProperty ( prefix = "spring.data.redis.repositories" , name = {"enabled" }, havingValue = "true" , matchIfMissing = true ) @ConditionalOnMissingBean ({RedisRepositoryFactoryBean.class})@Import ({RedisRepositoriesRegistrar.class})@AutoConfigureAfter ({RedisAutoConfiguration.class})public class RedisRepositoriesAutoConfiguration public RedisRepositoriesAutoConfiguration () } }
1 2 3 4 5 6 7 8 9 10 11 12 13 14 15 16 17 18 19 20 21 22 23 24 25 26 27 28 @Configuration ( proxyBeanMethods = false ) @ConditionalOnWebApplication ( type = Type.SERVLET ) @ConditionalOnClass ({WebServlet.class})@ConditionalOnProperty ( prefix = "spring.h2.console" , name = {"enabled" }, havingValue = "true" , matchIfMissing = false ) @AutoConfigureAfter ({DataSourceAutoConfiguration.class})@EnableConfigurationProperties ({H2ConsoleProperties.class}) public class H2ConsoleAutoConfiguration } @ConfigurationProperties ( prefix = "spring.h2.console" ) public class H2ConsoleProperties }
@ComponentScan:
表示将该类自动发现扫描组件。个人理解相当于,如果扫描到有@Component、@Controller、@Service、@Repository等这些注解的类,并注册为Bean,可以自动收集所有的Spring组件,包括@Configuration类。我们经常使用@ComponentScan注解搜索beans,并结合@Autowired注解导入。
如果没有配置的话,Spring Boot中@SpringBootApplication会扫描启动类所在包下以及子包下的组件。
@bean注解: 相当于xml中的bean标签, 标注在方法上,用于把一个类对象 加入IOC容器(返回某个实例的方法),交给spring管理(官网解释:bean是一个由Spring IoC容器实例化、组装和管理的对象。)。并且注意,Spring上加@Bean注解的都是默认单例模式
参考: https://www.awaimai.com/2596.html
ioC :在 Spring 中,类的实例化、依赖的实例化、依赖的传入 都交由 Spring Bean 容器控制,而不是用new方式实例化对象、通过非构造函数方法传入依赖等常规方式。在Spring中,我们基本不需要 new 一个类,这些都是让 Spring 去做的。Spring 启动时会把所需的类实例化成对象,如果需要依赖,则先实例化依赖,然后实例化当前类。依赖注入 :因为依赖必须通过构建函数传入,所以实例化时,当前类就会接收并保存所有依赖的对象。
@Import注解: 相对于@bean注解, 可以更便捷地将一个类加入IOC容器
@condition*注解: 一个类 满足特定的条件时才加入IOC容器(实例化对象)
@RestController:用于标注控制层组件(如struts中的action),@ResponseBody和@Controller的合集。
@RequestMapping:提供路由信息,负责URL到Controller中的具体函数的映射。
@ResponseBody:表示该方法的返回结果直接写入HTTP response body中 ,一般在异步获取数据时使用,用于构建RESTful的api。在使用@RequestMapping后,返回值通常解析为跳转路径,加上@Responsebody后返回结果不会被解析为跳转路径 (直接return 'index'表示跳转到index.html),而是直接写入HTTP response body中。比如异步获取json数据,加上@Responsebody后,会直接返回json数据。该注解一般会配合@RequestMapping一起使用。
@RequestBody将 HTTP 请求正文插入方法中,使用适合的 HttpMessageConverter 将请求体写入某个对象 。
该注解用于读取Request请求的body部分数据,使用系统默认配置的HttpMessageConverter进行解析,然后把相应的数据绑定到要返回的对象上;
再把HttpMessageConverter返回的对象数据绑定到 controller中方法的参数上。
SpringBoot提供的获取参数 注解包括:@PathVariable,@RequestParam,@RequestBody,三者的区别如下
接收json数据一定需要使用@RequestBody
@RequestParam: 表示从请求参数中获取的, 比如表单参数username
@RequestVariable: 表示从url中提取的, 比如"/user/{id}", 则写成@RequestVariable("id") Integer id
@Propertysource: 可以指定读取的配置文件,跟@Value一起使用
@Value:注入Spring boot application.properties配置的属性的值
@Autowired:自动导入依赖的bean, bean都是独立的, 但实际工作中,很多对象会依赖其他对象完成任务。这时候就需要能够将组件扫描得到的bean 和他们依赖装配在一起
@ImportResource:用来加载xml配置文件。
@Configuration和@Bean
@Configuration 和@Bean Spring的Java配置方式是通过@Configuration和@Bean 这两个注解实现的:<bean>;启动过程中会IOC容器找到Bean注解后会执行。要获得@Bean标注的对象时通过@Autowired从IOC容器中得到
读取spring.factories文件
加载XxxProperties类
根据@ConditionalXxx注解决定加载哪些组件
https://www.bilibili.com/video/BV1KE411K7PH?p=17
spring boot中的@EnableAutoConfiguration注解的作用就是开启自动配置,正是因为开启了自动配置,开发者在使用spring boot的时候就不用再填写繁琐的的配置项了,那么spring boot是如何实现这个自动配置的呢?
spring boot会根据开发者添加的依赖判断是否使用了某个技术 ,比如在依赖中有DispatcherServlet,那就说明使用了spring mvc技术。
spring boot判断出开发者所使用的技术之后 (导入相关依赖),会从自动配置(AutoConfigure)相关的包下找到该技术相关的配置类 。
spring boot会加载这些配置类,如果配置文件有写相关的配置信息的话会将该信息读取到配置类的对象中 ,然后加载到spring容器中,这样就完成了自动配置了。
在spring boot中自动配置类和配置类命名都是符合下面格式的: 自动配置类——*AutoConfiguration; 配置类——*Properties
▲如果不需要自动配置,可以@SpringBootApplication(exclude={RedisAutoConfiguration.class})
参考: https://www.bilibili.com/video/BV1sc411h7pN?p=8
配置文件 存放位置
当前项目根目录(工程根目录)中
当前项目根目录下的一个/config子目录中
项目的resources即classpath根路径中
项目的resources即classpath根路径下的/config目录中
注:
Q:为什么项目的resources是classpath根路径?A: 因为编译之后配置文件 会被放在target/classes目录下
使用classpath*:这种前缀,则可以代表多个匹配的文件 ;**/mapper/mapping/*Mapper.xml,双星号**表示在任意目录下,更多详情见:java项目中的classpath到底是什么
配置文件加载顺序
不同格式的加载顺序:
不同位置的加载顺序:
当前项目根目录下的一个/config子目录中(1最高)
当前项目根目录中(2其次)
项目的resources即classpath根路径下的/config目录中(3一般)
项目的resources即classpath根路径中(4最后)
对于应用程序而言, 不同的环境需要不同的配置。springboot框架提供了多profile管理功能,从而来区分不同环境的配置。
规定语法规则: application-{profile}.properties(.yml, .yaml)
激活制定profile: java-jar configuration_file-0.0.1-SNAPSHOT.jar--spring.profiles.active=dev;、java-jar configuration_file-e.e.1-SNAPSHOT.jar--spring.config.location=D:\config/
使用@PropertySource来加载其他配置文件(功能特殊列出or其他目录下)
1 2 3 @Component @PropertySource ("classpath:mqtt.properties" ) public class IotMqttClient
@PropertySource 中的属性解释
value:指明加载配置文件的路径。
ignoreResourceNotFound:指定的配置文件不存在是否报错,默认是false。当设置为 true 时,若该文件不存在,程序不会报错。实际项目开发中,最好设置 ignoreResourceNotFound 为 false。
encoding:指定读取属性文件所使用的编码,我们通常使用的是UTF-8。
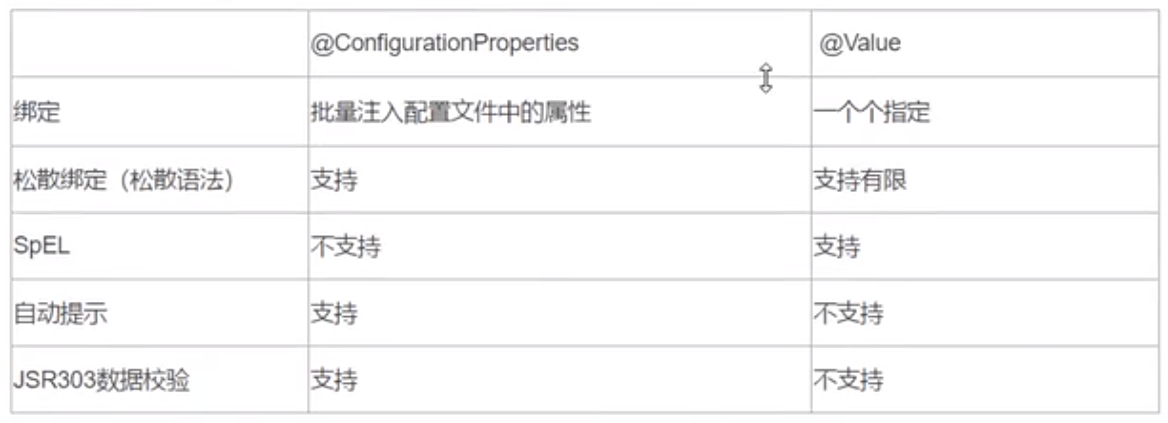
通过@Value + SPEL表达式 直接绑定springboot配置文件中的值
在注入类前加上@ConfiguartionProperties(prefix="user")注解后会从application.properties(.yml)中读取指定前缀的配置,(如果结合`@PropertySource("classpath:address-book.properties"则可以指定properties问题),从而节省了在每个成员字段前加@value
注:@ConfiguartionProperties和@Value两者会有冲突不能同时使用,出现时以单个的@Value为主(此时ConfiguartionProperties设置的prefix对于这个字段就是失效的,所以@Value="{xxx}",xxx要写全即跟配置文件中完全一致)
变量命名跟配置文件会进行匹配, 规则如下
不区分大小写
松散绑定: var_name和var-name和varName视为一种(@value不支持,@ConfiguartionProperties支持)
如果时复杂属性:List、set
在application.properties中以数组形式书写
在application.yml本身支持list,按yml书写即可
字符串,java代码中写工具类解析成数组
@SpringBootConfiguration:Spring Boot的配置类;标注在某个类上,表示这是一个Spring Boot的配置类 ;
我是先尝试的thymeleaf,弄了我一下午;接着是mybatis也弄了很久;最后才是redis, 虽然是因为解决了IDEA的Maven问题, 但确实也是redis连接最简单
1.[官网下载Redis](https://redis.io/download, 因为windows支持的不好, 因此还是直接在服务器上使用
1 2 3 4 5 6 7 $ wget http://download.redis.io/releases/redis-6.0.4.tar.gz $ tar xzf redis-6.0.4.tar.gz $ cd redis-6.0.4 $ make $ cd src $ ./redis-server $ ./redis-cli
外网连接设置
sudo vim /home/mrli/redis-6.0.4/redis.conf
将bind 127.0.0.1注释掉(含义为绑定可访问IP, 也就是说只能通过127.0.0.1访问)
将protected-mode yes设置为protected-mode no
解释:
默认情况bind=127.0.0.1只能接受本机的访问请求
不写的情况下,无限制接受任何ip地址的访问
如果开启了protected-mode,那么在没有设定bind ip且没有设密码的情况下,Redis只允许接受本机的相应
fromB站视频: https://www.bilibili.com/video/BV1J4411x7U1?p=45
3.使用Springboot整合
Springboot整合代码[代码重工]: http://39.108.113.88/content/country-spring-boot/detail/spring-boot-08
问题: 我默认从创建工程的SpringBoot版本是2.3.0, 然后直接导入maven依赖, 在IDEA中是显示红色,无法使用的。==>按照thymeleaf官方提供的2.3.0的导入方法仍然无效
A: 降低Springboot版本为2.1.14, 问题解决
浏览器显示: ->没有配置路由
1 2 3 4 5 6 Whitelabel Error Page This application has no explicit mapping for /error, so you are seeing this as a fallback. Fri May 29 15:30:09 CST 2020 There was an unexpected error (type=Not Found, status=404). No message available
浏览器显示: ->找不到模板
controller中返回的模板名与html文件名不一致
yml配置中prefix: classpath:/templates/设置错误,缺少末尾的/
1 2 3 4 5 6 Whitelabel Error Page This application has no explicit mapping for /error, so you are seeing this as a fallback. Fri May 29 15:30:49 CST 2020 There was an unexpected error (type=Internal Server Error, status=500). Error resolving template [hello], template might not exist or might not be accessible by any of the configured Template Resolvers
yml配置文件内容
1 2 3 4 5 6 7 8 9 spring: thymeleaf: prefix: classpath:/templates/ suffix: .html encoding: UTF-8 cache: false
controller内容
1 2 3 4 5 6 7 8 9 @Controller public class ThymeLeafGo @RequestMapping ("/test/thymeleaf" ) public String testThymeleaf () System.out.println("yes" ); return "hello" ; } }
hello.html内容
1 2 3 4 5 6 7 8 9 10 11 <!DOCTYPE html> <html lang ="en" xmlns:th ="http://www.thymeleaf.org" > <head > <meta charset ="UTF-8" > <title > Title</title > </head > <body > <p th:text ="经过服务器处理后可以看到的内容" > 直接打开HMTL查看到的内容</p > </body > </html >
th:text:文本替换;
${...} 变量表达式,Variable Expressions@{...} 链接表达式,Link URL Expressions#{...} 消息表达式,Message Expressions~{...} 代码块表达式,Fragment Expressions*{...} 选择变量表达式,Selection Variable Expressions
常用的内置对象(用${#xxx}提取)
常用的内置方法(用${#xxx}提取)
最大的问题还是依赖问题, 在pom.xml写入了但是没生效。重建一个新项目, 更换了IDEA的Maven后问题解决
先放个成功的结果
1 2 3 4 5 6 7 8 9 10 11 12 13 14 15 16 17 18 19 20 21 22 23 24 25 . ____ _ __ _ _ /\\ / ___'_ __ _ _(_)_ __ __ _ \ \ \ \ ( ( )\___ | '_ | '_| | '_ \/ _` | \ \ \ \ \\/ ___)| |_)| | | | | || (_| | ) ) ) ) ' |____| .__|_| |_|_| |_\__, | / / / / =========|_|==============|___/=/_/_/_/ :: Spring Boot :: (v2.1.14.RELEASE) 2020-05-29 20:21:38.066 INFO 9096 --- [ main] c.e.demo.test.DemoApplicationTests : Starting DemoApplicationTests on Mrli-computer with PID 9096 (started by Mr.li in G:\SpringBootProject\batis) 2020-05-29 20:21:38.066 DEBUG 9096 --- [ main] c.e.demo.test.DemoApplicationTests : Running with Spring Boot v2.1.14.RELEASE, Spring v5.1.15.RELEASE 2020-05-29 20:21:38.067 INFO 9096 --- [ main] c.e.demo.test.DemoApplicationTests : No active profile set, falling back to default profiles: default 2020-05-29 20:21:40.807 INFO 9096 --- [ main] o.s.s.concurrent.ThreadPoolTaskExecutor : Initializing ExecutorService 'applicationTaskExecutor' 2020-05-29 20:21:41.700 INFO 9096 --- [ main] c.e.demo.test.DemoApplicationTests : Started DemoApplicationTests in 4.224 seconds (JVM running for 5.81) 2020-05-29 20:21:42.163 ERROR 9096 --- [ main] com.alibaba.druid.pool.DruidDataSource : testWhileIdle is true, validationQuery not set 2020-05-29 20:21:42.179 INFO 9096 --- [ main] com.alibaba.druid.pool.DruidDataSource : {dataSource-1} inited 2020-05-29 20:21:42.451 DEBUG 9096 --- [ main] c.e.demo.mapper.EmpMapper.selectAll : ==> Preparing: select emp_id empId, emp_name empName, emp_age empAge from emp 2020-05-29 20:21:42.490 DEBUG 9096 --- [ main] c.e.demo.mapper.EmpMapper.selectAll : ==> Parameters: 2020-05-29 20:21:42.530 DEBUG 9096 --- [ main] c.e.demo.mapper.EmpMapper.selectAll : <== Total: 2 2020-05-29 20:21:42.533 DEBUG 9096 --- [ main] c.e.demo.test.DemoApplicationTests : Emp{empId=12, empName='cl', empAge=18} 2020-05-29 20:21:42.533 DEBUG 9096 --- [ main] c.e.demo.test.DemoApplicationTests : Emp{empId=14, empName='qsy', empAge=19} 2020-05-29 20:21:42.560 INFO 9096 --- [ Thread-1] com.alibaba.druid.pool.DruidDataSource : {dataSource-1} closed 2020-05-29 20:21:42.562 INFO 9096 --- [ Thread-1] o.s.s.concurrent.ThreadPoolTaskExecutor : Shutting down ExecutorService 'applicationTaskExecutor'
1 2 3 4 5 6 7 8 9 10 11 12 13 14 15 16 17 18 19 20 21 22 23 24 25 26 27 28 29 30 31 32 33 34 35 36 37 38 39 40 41 42 43 44 45 46 47 48 49 50 51 52 53 54 55 56 57 58 59 60 61 62 63 64 65 66 67 68 69 70 71 72 <? xml version="1.0" encoding="UTF-8" ?> <project xmlns ="http://maven.apache.org/POM/4.0.0" xmlns:xsi ="http://www.w3.org/2001/XMLSchema-instance" xsi:schemaLocation ="http://maven.apache.org/POM/4.0.0 https://maven.apache.org/xsd/maven-4.0.0.xsd" > <modelVersion > 4.0.0</modelVersion > <parent > <groupId > org.springframework.boot</groupId > <artifactId > spring-boot-starter-parent</artifactId > <version > 2.1.14.RELEASE</version > <relativePath /> </parent > <groupId > com.example</groupId > <artifactId > demo</artifactId > <version > 0.0.1-SNAPSHOT</version > <name > demo</name > <description > Demo project for Spring Boot</description > <properties > <java.version > 1.8</java.version > </properties > <dependencies > <dependency > <groupId > org.springframework.boot</groupId > <artifactId > spring-boot-starter-web</artifactId > </dependency > <dependency > <groupId > org.mybatis.spring.boot</groupId > <artifactId > mybatis-spring-boot-starter</artifactId > <version > 2.1.2</version > </dependency > <dependency > <groupId > mysql</groupId > <artifactId > mysql-connector-java</artifactId > </dependency > <dependency > <groupId > com.alibaba</groupId > <artifactId > druid</artifactId > <version > 1.0.5</version > </dependency > <dependency > <groupId > org.springframework.boot</groupId > <artifactId > spring-boot-starter-test</artifactId > <scope > test</scope > <exclusions > <exclusion > <groupId > org.junit.vintage</groupId > <artifactId > junit-vintage-engine</artifactId > </exclusion > </exclusions > </dependency > <dependency > <groupId > org.junit.jupiter</groupId > <artifactId > junit-jupiter</artifactId > <version > RELEASE</version > <scope > test</scope > </dependency > </dependencies > <build > <plugins > <plugin > <groupId > org.springframework.boot</groupId > <artifactId > spring-boot-maven-plugin</artifactId > </plugin > </plugins > </build > </project >
1 2 3 4 5 6 7 8 9 10 11 12 13 14 15 16 17 18 19 20 21 22 23 24 25 26 27 28 29 30 31 32 33 34 server: port: 8888 spring: thymeleaf: suffix: .html encoding: UTF-8 cache: false prefix: classpath:/templates/ datasource: name: mydb type: com.alibaba.druid.pool.DruidDataSource url: jdbc:mysql://127.0.0.1:3306/smybatis?serverTimezone=UTC username: root password: * driver-class-name: com.mysql.cj.jdbc.Driver mybatis: mapper-locations: classpath*:/mybatis/mapper/*Mapper.xml logging: level: com: example: demo: mapper: debug test: debug
1 2 3 4 5 6 7 8 9 <!DOCTYPE mapper PUBLIC "-//mybatis.org//DTD Mapper 3.0//EN" "http://mybatis.org/dtd/mybatis-3-mapper.dtd"> <mapper namespace ="com.example.demo.mapper.EmpMapper" > <select id ="selectAll" resultType ="com.example.demo.entity.Emp" > select emp_id empId, emp_name empName, emp_age empAge from emp </select > </mapper >
注: 由于在Mybatis的mapper.xml文件中,如果resultType的type或者paramterType会返回自定义entity的话,那么需要用全类名名来指定这些实体。而一种好的便捷方法是,application.yml中可以添加mybatis-type-aliases-package: com.example.demo.mapper,其可以使用type-aliases-package中指定entity扫描包类从而让mybatis自己扫描到自定义的entity,直接写非限定名(短名)即可,如下所示。
1 2 3 4 5 <mapper namespace ="com.itheima.dao.ItemsDao" > <select id ="findById" parameterType ="int" resultType ="items" > select * from items where id = #{id} </select > </mapper >
src-main-java-DemoApplication.java 1 2 3 4 5 6 7 8 9 10 11 12 package com.example.demo;import org.mybatis.spring.annotation.MapperScan;import org.springframework.boot.SpringApplication;import org.springframework.boot.autoconfigure.SpringBootApplication;@MapperScan ("com.example.demo.mapper" ) @SpringBootApplication public class DemoApplication public static void main (String[] args) }
1 2 3 4 5 6 7 8 9 10 11 12 13 14 15 16 17 18 package com.example.demo.mapper;import com.example.demo.entity.Emp;import java.util.List;public interface EmpMapper List<Emp> selectAll () ; }
1 2 3 4 5 6 7 8 9 10 11 12 13 14 15 16 17 18 19 20 21 22 23 24 25 26 27 28 29 30 31 32 33 34 35 36 37 38 39 40 41 42 43 44 45 46 47 48 49 50 51 52 53 54 55 56 57 package com.example.demo.entity;public class Emp private Integer empId; private String empName; private Integer empAge; public Emp (Integer empId, String empName, Integer empAge) this .empId = empId; this .empName = empName; this .empAge = empAge; } public Emp () } public Integer getEmpId () return empId; } public void setEmpId (Integer empId) this .empId = empId; } public String getEmpName () return empName; } public void setEmpName (String empName) this .empName = empName; } public Integer getEmpAge () return empAge; } public void setEmpAge (Integer empAge) this .empAge = empAge; } @Override public String toString () return "Emp{" + "empId=" + empId + ", empName='" + empName + '\'' + ", empAge=" + empAge + '}' ; } }
com.example.demo.test
1 2 3 4 5 6 7 8 9 10 11 12 13 14 15 16 17 18 19 20 21 22 23 24 25 26 27 28 29 30 31 32 package com.example.demo.test;import com.example.demo.entity.Emp;import com.example.demo.mapper.EmpMapper;import org.junit.jupiter.api.Test;import org.junit.runner.RunWith;import org.slf4j.Logger;import org.slf4j.LoggerFactory;import org.springframework.beans.factory.annotation.Autowired;import org.springframework.boot.test.context.SpringBootTest;import org.springframework.test.context.junit4.SpringRunner;import java.util.List;@RunWith (SpringRunner.class)@SpringBootTest class DemoApplicationTests @Autowired private EmpMapper empMapper; private Logger logger = LoggerFactory.getLogger(DemoApplicationTests.class); @Test public void testSelectAll () List<Emp> emps = empMapper.selectAll(); for (Emp emp : emps) { logger.debug(emp.toString()); } } }
视频提供的代码配置链接: http://39.108.113.88/content/country-spring-boot/detail/spring-boot-07
上述几个整合教程来自B站: https://www.bilibili.com/video/BV1KE411K7PH/?p=20&t=790
代码组成:
1 2 3 4 5 6 7 8 9 10 11 12 13 14 15 16 17 18 19 20 21 22 @RestController public class PersonController @Autowired PersonRepository personRepository; @GetMapping ("/findall" ) public List<Person> findAll () List<Person> personRepositoryAll = personRepository.findAll(); return personRepositoryAll; } @GetMapping ("/findById/{id}" ) public Person findById (@PathVariable("id" ) Integer id) return personRepository.findById(id).get(); } @PostMapping ("/save" ) public Person save (@RequestBody Person person) return personRepository.save(person); } }
1 2 3 4 5 6 7 8 9 10 11 12 @Data @Entity public class Person @Id @GeneratedValue (strategy = GenerationType.IDENTITY) private Integer id; @Column private String username; @Column private String password; }
1 2 3 4 5 6 7 8 9 10 11 12 13 public interface PersonRepository extends JpaRepository <Person , Integer > }
1 2 3 4 5 6 7 8 9 10 11 12 datasource: name: mydb url: jdbc:mysql://127.0.0.1:3306/person?serverTimezone=UTC username: root password: cl123123 driver-class-name: com.mysql.cj.jdbc.Driver jpa: show-sql: true properties: hibernate: format_sql: true
实现WebMvcConfigurer接口可以扩展MVC的功能实现,又既保留SpringBoot的自动配置(原因是:在WebMvcAutoConfiguration 也有一个实现了WebMvcConfigurer的配置类)
1 2 3 4 5 6 7 8 9 10 11 12 13 14 15 16 17 @Configuration public class DafMVCConfiguartion implements WebMvcConfigurer @Bean public WebMvcConfigurer corsConfigurer () return new WebMvcConfigurer() { @Override public void addCorsMappings (CorsRegistry registry) registry.addMapping("api/**" ); } }; } @Override public void addInterceptors (InterceptorRegistry registry) } }
为什么通过实现WebMvcConfigurer能进行配置的原理:
如果没有,由于WebMvcAutoConfiguration 也有一个内部类WebMvcAutoConfigurationAdapter 实现了WebMvcConfigurer的配置类,因此可以帮我们进行自动的配置
WebMvcAutoConfigurationAdapter 它也是利用这种方式实现WebMvcConfigurer去进行扩展的,所以我们通过查看这个类我们发现它帮我们实现了其他不常用的方法,帮助我们进行自动配置,我们只需定制(拦截器、视图控制器CORS在开发中需要额外定制的定制的功能)
注: 一个方法上添加了autowired注解后,它的参数将从容器中自动注入进来。
为什么实现WebMvcConfigurer后能work?
A:原因是①MVC应用会自动开启WebMvcAutoConfiguration ,因此会加载WebMvcAutoConfigurationAdapter ,②而WebMvcAutoConfigurationAdapter 上有着@EnableWebMvcConfiguration注解@Import({WebMvcAutoConfiguration.EnableWebMvcConfiguration.class}. ③EnableWebMvcConfiguration这个类继承了DelegatingWebMvcConfiguration类(它会加载配置),④而在DelegatingWebMvcConfiguration中的setConfigurers(List<WebMvcConfigurer> configurers)方法上是有@Autowired注解,⑤因此会将所有实现了WebMvcConfigurer的Bean给注入到这个List参数中,并且全部进行设置this.configurers.addWebMvcConfigurers(configurers);即设置到委派类WebMvcConfigurerComposite的delegates中去。
1 2 3 4 5 6 7 8 9 10 11 public class DelegatingWebMvcConfiguration extends WebMvcConfigurationSupport private final WebMvcConfigurerComposite configurers = new WebMvcConfigurerComposite(); public DelegatingWebMvcConfiguration () } @Autowired (required = false ) public void setConfigurers (List<WebMvcConfigurer> configurers) if (!CollectionUtils.isEmpty(configurers)) { this .configurers.addWebMvcConfigurers(configurers); } }
⑥而每次调用WebMvcConfigurerComposite的addXxxx功能时都会将被委派的类的方法,从而调用了MyMVCConfiguartion我们自定义的MVC配置类下的各种addXxxx方法
1 2 3 4 5 6 7 8 9 10 11 class WebMvcConfigurerComposite implements WebMvcConfigurer private final List<WebMvcConfigurer> delegates = new ArrayList(); public void addInterceptors (InterceptorRegistry registry) Iterator var2 = this .delegates.iterator(); while (var2.hasNext()) { WebMvcConfigurer delegate = (WebMvcConfigurer)var2.next(); delegate.addInterceptors(registry); } } }
from:通过实现WebMvcConfigurer进行拓展MVC功能的原理
系统内部有抛出异常的需求,但根据不要在页面上给用户显示错误,因此要进行异常捕捉
@ExceptionHandter的含义是当前的方法是用于处理什么异常类型的
1 2 3 4 5 6 7 8 9 10 11 12 13 14 15 16 17 18 19 20 21 22 23 24 25 26 27 28 29 30 31 32 33 34 35 36 37 @RestController public class ErrorController @ResponseBody @GetMapping ("/xxx" ) public String throwError () int i = 1 /0 ; return "yes" ; } } @ControllerAdvice public class ExceptionController @ResponseBody @ExceptionHandler (Exception.class) public MyError processException () MyError myError = new MyError(); myError.setCode(400 ); myError.setMsg("被捕捉到了" ); return myError; } } @ControllerAdvice class DafGlobalExceptionHandler @ResponseBody @ExceptionHandler (BizException::class ) fun processException(e: BizException): ResResult { return ResResult.err(e.msg) } }
1 2 3 4 5 6 7 8 9 10 11 public class MyErrorPageController implements ErrorController @Override public String getErrorPath () return "/error" ; } @GetMapping ("/error" ) public String errorView () return "/error" ; } }
spring mvc的拦截器是只拦截controller而不拦截jsp,html 页面文件的。这就用到过滤器filter了,filter是在servlet前执行的,你也可以理解成过滤器中包含拦截器,一个请求过来 ,先进行过滤器处理,看程序是否受理该请求 。 过滤器放过后 , 程序中的拦截器进行处理 。
拦截器不依赖servlet容器,过滤器依赖;
拦截器是基于java反射机制来实现的,过滤器基于回调
创建自己的过滤器类实现javax.servlet.Filter接口
重写doFilter 的方法,在此方法里写过滤操作
在类上使用注解@WebFilter(filterName=”myFilter”,urlPatterns={“/*”})
1 2 3 4 5 6 7 8 9 10 11 12 13 14 15 16 17 18 19 20 21 22 23 24 25 26 27 @WebFilter (filterName="myFilter" ,urlPatterns={"/*" })public class MyFilter implements Filter @Override public void destroy () System.out.println("myfilter 的 销毁方法" ); } @Override public void doFilter (ServletRequest arg0, ServletResponse arg1, FilterChain chain) throws IOException, ServletException { System.out.println("myfilter 的 过滤方法。这里可以执行过滤操作" ); chain.doFilter(arg0, arg1); } @Override public void init (FilterConfig arg0) throws ServletException System.out.println("myfilter 的 初始化方法" ); } }
创建自己的监听类实现 ServletContextListener 接口,这个是监听servlet的
创建自己的监听类实现 HttpSessionListener 接口,这个是监听session 的
记得在自定义的监听类上添加注解@WebListener
1 2 3 4 5 6 7 8 9 10 11 12 13 14 @WebListener public class SessionListener implements HttpSessionListener @Override public void sessionCreated (HttpSessionEvent arg0) System.out.println("监听 创建session" ); } @Override public void sessionDestroyed (HttpSessionEvent arg0) System.out.println("监听 销毁session" ); } }
创建自己的拦截器类,实现HandlerInterceptor 接口
实现一个HandlerInterceptor拦截器可以直接实现HandlerInterceptor接口,也可以继承HandlerInterceptorAdapter类。
创建一个配置类,继承自WebMvcConfigurerAdapter ,并在类上添加注解@Configuration
重写addInterceptors方法,把自定义的拦截类注册进去。
自定义拦截器:
1 2 3 4 5 6 7 8 9 10 11 12 13 14 15 16 17 18 19 20 public class MyInterceptor implements HandlerInterceptor @Override public void afterCompletion (HttpServletRequest arg0, HttpServletResponse arg1, Object arg2, Exception arg3) throws Exception { System.out.println("MyInterceptor 在整个请求结束之后被调用,也就是在DispatcherServlet 渲染了对应的视图之后执行" ); } @Override public void postHandle (HttpServletRequest arg0, HttpServletResponse arg1, Object arg2, ModelAndView arg3) throws Exception { System.out.println("MyInterceptor 请求处理之后进行调用,但是在视图被渲染之前(Controller方法调用之后)" ); } @Override public boolean preHandle (HttpServletRequest arg0, HttpServletResponse arg1, Object arg2) throws Exception System.out.println("MyInterceptor 在请求处理之前进行调用(Controller方法调用之前)这里是拦截的操作" ); return true ; } }
注册拦截器 继承 WebMvcConfigurerAdapter
1 2 3 4 5 6 7 8 9 10 11 @Configuration public class WebConfigurer extends WebMvcConfigurerAdapter @Override public void addInterceptors (InterceptorRegistry registry) registry.addInterceptor(new MyInterceptor()).addPathPatterns("/**" ).excludePathPatterns("/login" ); super .addInterceptors(registry); } }
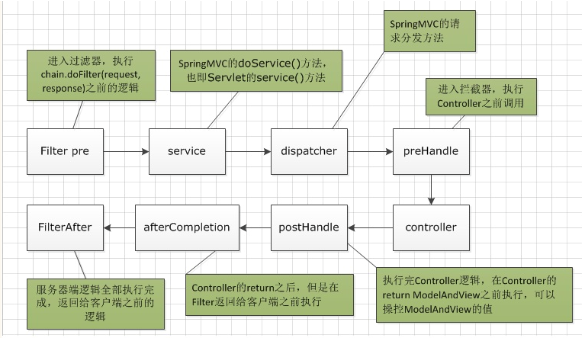
执行过程:
preHandle:Controller方法处理之前;链式Intercepter情况下,Intercepter按照声明的顺序一个接一个执行
postHandle:Controller方法处理完之后,DispatcherServlet进行视图的渲染之前,也就是说在这个方法中你可以对ModelAndView进行操作;
afterCompletion:在整个请求完成之后即,DispatcherServlet进行视图的渲染之后
事件监听的流程
自定义事件,一般是继承ApplicationEvent抽象类
定义事件监听器,一般是实现ApplicationListener接口
需要把监听器加入到spring容器中:
可以通过启动的时候添加
增加Component注解
通过context.listener.classes配置项导入进去
使用@EventListener注解:在方法上加@EventListener注解,并将该类注入到spring容器中
发布事件,使用ApplicationContext.publishEvent发布事件
Quartz是OpenSymphony开源组织在Job scheduling领域又一个开源项目,完全由Java开发,可以用来执行定时任务,类似于java.util.Timer。但是相较于Timer, Quartz增加了很多功能:
组成:
调度器:Scheduler,用来调度管理Trigger去执行指定的Job呢
任务:JobDetail
触发器:Trigger,包括SimpleTrigger和CronTrigger
在springboot中可以有很多方案去帮我们完成定时器的工作,有Java自带的java.util.Timer类,也有强大的调度器Quartz,还有SpringBoot自带的Schedule ==> 相对于Quartz是适用于普通Java工程,Scheduled 针对于springboot设计
在实际应用中,如果没有分布式场景(quartz 支持分布式, schedule 不支持(需要自己实现,用分布式锁),schedule跟spring结合的更好,还是很适用的。
SpringBoot内置了Sping Schedule定时框架,通过注解驱动方式添加所注解方法到定时任务,根据配置定时信息定时执行。
无序导入依赖: Spring的Schedule包含在spring-boot-starter 模块中,无需引入其他依赖。
在application上加上@EnableScheduling注解打开定时功能
在定时任务上增加注解@Scheduled(cron = "0/3 * * * * *")
固定频率:@Scheduled(fixedRate = 3000): 如果方法执行时间超过定时器时间, 方法执行完成后直接执行任务——补偿机制,如执行了5000ms,之后会立马把阻塞未执行的给执行了
固定间隔: @Scheduled(fixedDelay = 3000): 方法执行完成后, 停留间隔时间, 再次执行该方法——如执行了5000ms后还会在等3000ms执行,不因为方法执行时间长度影响定时器
Cron表达式: @Scheduled(cron = “0/3 * * * * *”):*固定按照间隔时间执行, 方法执行完成后, 按照间隔时间点再次执行该方法——比如方法执行5s, 定时间隔为3s, 则中间有一次执行不上, 不理会,而是当第二个3s间隔,即第6s开始下一次执行
1 2 3 4 5 6 7 8 9 10 @SpringBootApplication @EnableAsync @EnableScheduling @MapperScan (basePackages = {"com.gupao.springboot.*.mapper" })public class GupaoSpringbootApplication public static void main (String[] args) SpringApplication.run(GupaoSpringbootApplication.class, args); } }
Spring的Schecule默认是单线程执行的,如果你定义了多个任务,那么他们将会被串行执行,会严重不满足你的预期。所以为了解决该问题,需要自定义线程池,具体如下:
1 2 3 4 5 6 7 8 9 10 11 12 @Component public class ScheduleConfig implements SchedulingConfigurer @Override public void configureTasks (ScheduledTaskRegistrar taskRegistrar) taskRegistrar.setScheduler(customScheduler()); } @Bean (destroyMethod = "shutdown" ) public ExecutorService customScheduler () return Executors.newScheduledThreadPool(20 ); } }
from: SpringBoot:@Schedule定时任务
PO,entity:persistent object 持久对象
有时也被称为Data对象,对应数据库中的entity,可以简单认为一个PO对应数据库中的一条记录。
Vo: view object 表现层对象
主要对应页面显示(web页面/swt、swing界面)的数据对象。
可以和表对应,也可以不,这根据业务的需要。
DTO(TO):Data Transfer Object 数据传输对象
比如一张表有100个字段,那么对应的PO就有100个属性(大多数情况下,DTO内的数据来自多个表)。但view层只需显示10个字段,没有必要把整个PO对象传递到client,这时我们就可以用只有这10个属性的DTO来传输数据到client,这样也不会暴露server端表结构。到达客户端以后,如果用这个对象来对应界面显示,那此时它的身份就转为VO。
POJO:plain ordinary java object 无规则简单java对象
一个中间对象,可以转化为PO、DTO、VO。
POJO持久化之后==>PO
POJO用作表示层==>VOI
POJO传输过程中==>DTO
1 2 3 4 5 spring.mvc.static-path-pattern=classpath:/ # 更多可查看ResourceProperties类中 # private static final String[] CLASSPATH_RESOURCE_LOCATIONS = new String[]{"classpath:/META-INF/resources/", "classpath:/resources/", "classpath:/static/", "classpath:/public/"}; server.port=8889
1 2 3 4 5 6 7 8 9 10 11 12 13 14 15 16 17 18 19 20 21 22 23 24 25 26 27 28 server: port: 8889 spring: datasource: name: mydb url: jdbc:mysql://127.0.0.1:3306/person?serverTimezone=UTC username: root password: cl123123 driver-class-name: com.mysql.cj.jdbc.Driver jpa: show-sql: true properties: hibernate: format_sql: true mvc: favicon: enabled: false mybatis: mapper-locations: classpath*:/mybatis/mapper/*Mapper.xml logging: level: com.atguigu.spring.boot.mapper: debug
总共列出了全部1237个配置项,以及他们的含义和默认值!
1 2 3 4 5 6 7 8 9 10 11 12 13 14 15 16 17 18 19 20 21 22 23 24 25 26 27 28 29 30 31 32 33 34 35 src |─main | |─java | | |─xyz.guqing.creek ------ 根包名 | | | |─aspect ------ aop切面 | | | |─config ------ springboot自动配置 | | | |─controller ------ controller接口 | | | |─mapper ------ mybatis mapper接口 | | | |─exception ------ 自定义异常 | | | |─service ------ service层 | | | |─model ------ 模型类 | | | | |─entity ------ 数据库对应的实体 | | | | |─enums ------ 枚举 | | | | |─params ------ controller中入参数修改类型的入参数命名为xxxParam查询的为xxxQuery——————should be: DTO | | | | |─dto ------ controller出参实体——————should be: VO | | | | |─annotation ------ 自定义注解 | | | | |─dos ------ 数据库组合实体例如关联查询需要多表字段组合 | | | | |─bo ------ 业务逻辑实体,例如支付service方法调用支付方法传递组合参数 | | | | |─properties ------ 自动配置properties实体 | | | |─factory ------ 自定义工厂类 | | | |─event ------ 自定义事件 | | | |─listener ------ 事件监听器 | | | |─convert ------ 自定义类型转换器 | | | |─handler ------ 处理器类 | | | |─security ------ spring security安全控制 | | | |─utils ------ 自定义工具类 | |─resources | | |─db ------ 数据库sql | | |─mapper ------ mybatis自定义mapper xml | | |─templates ------ 模板文件例如邮件模板 |─test | |─java | | |─com.happyland.ums | | | |─service ------ service层单元测试类 | | | |─utils ------ 自定义工具单元测试类
@PostConstruct 是个类初始化后执行的钩子注解,用来执行类初始化之后、类正式投入之前需要执行的方法
在非拦截器类上定义的方法必须具有以下签名:void <METHOD>()应用PostConstruct的方法可以是public,protected,package private或private。
关于类初始化@PostConstruct 、@Autowired和Construct构造函数 顺序为:1.构造函数 > 2.@Autowired > 3.@PostConstruct 。
如果一个类BeanA中上述三者都有,且@Autowired注入的类BeanB中也都有上述三者,则调用顺序为:
1 2 3 4 5 6 > 这是 Bean A 的构造方法 > 这是 Bean B 的构造方法 > 这是 Bean B 的 init 方法 > 这是 Bean A 的 init 方法 > 这是 Bean B 的 testB 方法 >
1 2 3 4 5 6 7 8 9 10 11 12 13 14 15 16 17 @PropertySource ("classpath:mqtt.properties" )@Component public class MqttConfiguration @Value ("${url}" ) public String host; @Value ("${consumer.defaultTopic}" ) public String topic; @Value ("${username}" ) public String name; @Value ("${password}" ) public String passWord; }
1 2 3 4 5 6 7 8 9 10 11 12 13 14 15 16 17 18 19 20 21 22 23 24 25 26 27 28 29 30 31 32 33 34 35 36 37 38 39 40 41 42 43 44 45 46 47 48 49 50 51 52 53 54 55 56 57 58 59 60 61 62 63 64 65 66 67 68 69 70 71 72 73 74 75 76 77 78 79 80 81 82 83 84 85 86 87 88 89 90 91 92 @Slf 4j@Component public class IotMqttClient @Autowired private MqttConfiguration mqttConfiguration; private MqttClient client; private static List<String> subedTopics = new ArrayList<>(); @PostConstruct public void init () String clientId = String.valueOf(System.currentTimeMillis()); int qos = 0 ; try { client = new MqttClient(mqttConfiguration.host, clientId, new MemoryPersistence()); client.setCallback(new ReportMqtt(this )); client.connect(makeUpMqttOption()); subscribe(mqttConfiguration.topic, qos); } catch (Exception e) { log.info("ReportMqtt客户端连接异常,异常信息:" + e); } } private MqttConnectOptions makeUpMqttOption () MqttConnectOptions options = new MqttConnectOptions(); options.setCleanSession(true ); options.setUserName(mqttConfiguration.name); options.setPassword(mqttConfiguration.passWord.toCharArray()); options.setConnectionTimeout(10 ); options.setKeepAliveInterval(3600 ); return options; } public void publish (String topic, String pushMessage) publish(0 , false , topic, pushMessage); } public void publish (int qos, boolean retained, String topic, String pushMessage) MqttMessage message = new MqttMessage(); message.setQos(qos); message.setRetained(retained); message.setPayload(pushMessage.getBytes()); MqttTopic mTopic = client.getTopic(topic); if (null == mTopic) { log.error("topic not exist" ); } try { MqttDeliveryToken token = mTopic.publish(message); } catch (MqttPersistenceException e) { e.printStackTrace(); } catch (MqttException e) { e.printStackTrace(); } } public void subscribe (String topic) subscribe(topic, 0 ); subedTopics.add(topic); } public void subscribe (String topic, int qos) try { client.subscribe(topic, qos); } catch (MqttException e) { e.printStackTrace(); } } }