Mrli
别装作很努力,
因为结局不会陪你演戏。
Contacts:
QQ博客园

Shiro使用学习

2021/09/07 Java 应用框架学习
Word count: 2,672 | Reading time: 12min

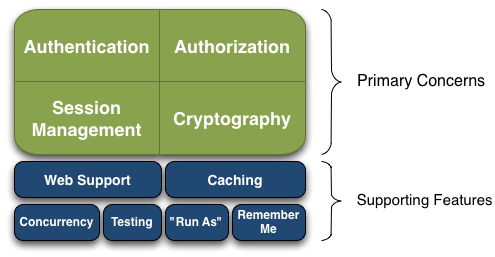
Apache Shiro 是一个强大易用的 Java 安全框架,提供了认证、授权、加密和会话管理等功能(如下图),对于任何一个应用程序,Shiro 都可以提供全面的安全管理服务。并且相对于其他安全框架,Shiro 要简单的多。

Shiro 的架构

从外部来看应该具有非常简单易于使用的 API,且 API 契约明确;从内部来看的话,其应该有一个可扩展的架构,即非常容易插入用户自定义实现,

交互流程如下:

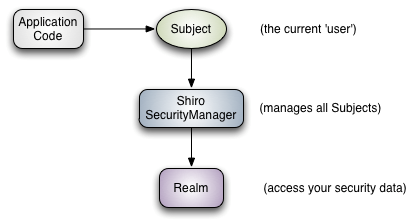
应用代码直接交互的对象是 Subject,也就是说 Shiro 的对外 API 核心就是 Subject。

Subject:主体,代表了当前 “用户”,这个用户不一定是一个具体的人,与当前应用交互的任何东西都是 Subject,如网络爬虫,机器人等;即一个抽象概念;所有 Subject 都绑定到 SecurityManager,与 Subject 的所有交互都会委托给 SecurityManager;可以把 Subject 认为是一个门面;SecurityManager 才是实际的执行者;

SecurityManager:安全管理器;即所有与安全有关的操作都会与 SecurityManager 交互;且它管理着所有 Subject;可以看出它是 Shiro 的核心,它负责与后边介绍的其他组件进行交互,如果学习过 SpringMVC,你可以把它看成 DispatcherServlet 前端控制器;

Realm:域,Shiro 从 Realm 获取安全数据(如用户、角色、权限),就是说 SecurityManager 要验证用户身份,那么它需要从 Realm 获取相应的用户进行比较以确定用户身份是否合法;也需要从 Realm 得到用户相应的角色 / 权限进行验证用户是否能进行操作;可以把 Realm 看成 DataSource,即安全数据源。

★也就是说对于我们而言,最简单的一个 Shiro 应用:

  1. 应用代码通过 Subject 来进行认证和授权,而 Subject 又委托给 SecurityManager;
  2. 我们需要给 Shiro 的 SecurityManager 注入 Realm,从而让 SecurityManager 能得到合法的用户及其权限进行判断。

具体的架构设计与组件:

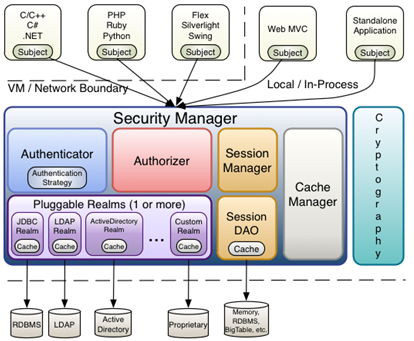
  • Subject:主体,可以看到主体可以是任何可以与应用交互的 “用户”;
  • SecurityManager:相当于 SpringMVC 中的 DispatcherServlet 或者 Struts2 中的 FilterDispatcher;是 Shiro 的心脏;所有具体的交互都通过 SecurityManager 进行控制;它管理着所有 Subject、且负责进行认证和授权、及会话、缓存的管理。
  • Authenticator:认证器,负责主体认证的,这是一个扩展点,如果用户觉得 Shiro 默认的不好,可以自定义实现;其需要认证策略(Authentication Strategy),即什么情况下算用户认证通过了;
  • Authorizer:授权器,或者访问控制器,用来决定主体是否有权限进行相应的操作;即控制着用户能访问应用中的哪些功能;
  • Realm:可以有 1 个或多个 Realm,可以认为是安全实体数据源,即用于获取安全实体的;可以是 JDBC 实现,也可以是 LDAP 实现,或者内存实现等等;由用户提供;注意:Shiro 不知道你的用户 / 权限存储在哪及以何种格式存储;所以我们一般在应用中都需要实现自己的 Realm;

Realm

Realm:域,ShiroRealm获取安全数据(如用户、角色、权限),就是说 SecurityManager 要验证用户身份,那么它需要从 Realm 获取相应的用户进行比较以确定用户身份是否合法;也需要从 Realm 得到用户相应的角色 / 权限进行验证用户是否能进行操作;可以把 Realm 看成 DataSource,即安全数据源。

身份验证

身份验证和授权是Shiro两个主要的功能。

身份验证,即在应用中谁能证明他就是他本人。一般提供如他们的身份 ID 一些标识信息来表明他就是他本人,如提供身份证,用户名 / 密码来证明。

在 shiro 中,用户需要提供 principals (身份)和 credentials(证明)给 shiro,从而应用能验证用户身份:

principals:身份,即主体的标识属性,可以是任何东西,如用户名、邮箱等,唯一即可。一个主体可以有多个 principals,但只有一个 Primary principals,一般是用户名 / 密码 / 手机号。

credentials:证明 / 凭证,即只有主体知道的安全值,如密码 / 数字证书等。

身份认证流程

流程如下:

  1. 首先调用 Subject.login(token) 进行登录,其会自动委托给 Security Manager,调用之前必须通过 SecurityUtils.setSecurityManager() 设置;
  2. SecurityManager 负责真正的身份验证逻辑;它会委托给 Authenticator 进行身份验证;
  3. Authenticator 才是真正的身份验证者,Shiro API 中核心的身份认证入口点,此处可以自定义插入自己的实现;
  4. Authenticator 可能会委托给相应的 AuthenticationStrategy 进行多 Realm 身份验证,默认 ModularRealmAuthenticator 会调用 AuthenticationStrategy 进行多 Realm 身份验证;
  5. Authenticator会把相应的 token 传入 Realm,从 Realm 获取身份验证信息,如果没有返回 / 抛出异常表示身份验证成功了。此处可以配置多个 Realm,将按照相应的顺序及策略进行访问。

授权

from:

附录

官方十分钟教程-独立程序篇

1
2
3
4
5
6
7
8
9
10
11
12
13
<dependencies>
<dependency>
<groupId>org.apache.shiro</groupId>
<artifactId>shiro-core</artifactId>
<version>1.2.3</version>
</dependency>

<dependency>
<groupId>org.slf4j</groupId>
<artifactId>slf4j-simple</artifactId>
<version>1.6.1</version>
</dependency>
</dependencies>
1
2
3
4
5
6
7
8
9
10
11
12
13
14
15
16
17
18
19
20
21
22
23
24
25
26
27
28
29
30
31
32
33
34
35
36
37
38
39
40
41
42
43
44
45
46
47
48
49
50
51
52
53
54
55
56
57
58
59
60
61
62
63
64
65
66
67
68
69
70
71
72
73
74
75
76
77
78
79
80
81
82
83
84
85
86
87
88
89
90
91
92
93
94
95
96
97
98
99
100
101
102
103
104
105
106
107
108
109
110
111
112
113
114
115
// Quickstart.java
public class Quickstart {

private static final transient Logger log = LoggerFactory.getLogger(Quickstart.class);


public static void main(String[] args) {

// The easiest way to create a Shiro SecurityManager with configured
// realms, users, roles and permissions is to use the simple INI config.
// We'll do that by using a factory that can ingest a .ini file and
// return a SecurityManager instance:
/**
* 这是最简单的方法通过配置去创建一个Shiro SecurityManager。
* realms, users, roles 和 permissions都是通过这个简单的ini文件配置的
* 我们通过使用工厂方式读取配置文件并获取一个SecurityManager实例
*/
// Use the shiro.ini file at the root of the classpath
// 使用classpaht根目录的shiro.ini文件
// (file: and url: prefixes load from files and urls respectively):
// file: 和url: 这两个前缀分别从files和urls加载的
IniSecurityManagerFactory factory = new IniSecurityManagerFactory("classpath:shiro.ini");
SecurityManager securityManager = factory.getInstance();

// for this simple example quickstart, make the SecurityManager
// accessible as a JVM singleton. Most applications wouldn't do this
// and instead rely on their container configuration or web.xml for
// webapps. That is outside the scope of this simple quickstart, so
// we'll just do the bare minimum so you can continue to get a feel
// for things.
/**
* quickstart这个例子中,使用的SecurityManager是JVM单例的。许多应用程序不这样做。
* 比如要配置web.xml等。但是不在quickstart范围内。
* 我们只是最小限度的让你明白你在做什么。。。。。
*/
SecurityUtils.setSecurityManager(securityManager);

// Now that a simple Shiro environment is set up, let's see what you can do:
// 现在一个简单的Shiro环境就已经设置好了
// get the currently executing user:
// 获取当前执行的用户
Subject currentUser = SecurityUtils.getSubject();

// Do some stuff with a Session (no need for a web or EJB container!!!)
// 用session做一些事,不需要web或者EJB容器就能使用session
Session session = currentUser.getSession();
session.setAttribute("someKey", "aValue");
String value = (String) session.getAttribute("someKey");
if (value.equals("aValue")) {
log.info("Retrieved the correct value! [" + value + "]");
}

// let's login the current user so we can check against roles and permissions:
// 用当前用户登录,检查角色和权限
if (!currentUser.isAuthenticated()) {
// 设置当前用户的信息
// UsernamePasswordToken token = new UsernamePasswordToken("presidentskroob", "vespa");
UsernamePasswordToken token = new UsernamePasswordToken("presidentskroob", "12345");
// rememberMe功能
token.setRememberMe(true);
try {
// 登录
currentUser.login(token);
// 登录失败的一些异常捕获
} catch (UnknownAccountException uae) {
log.info("There is no user with username of " + token.getPrincipal());
} catch (IncorrectCredentialsException ice) {
log.info("Password for account " + token.getPrincipal() + " was incorrect!");
} catch (LockedAccountException lae) {
log.info("The account for username " + token.getPrincipal() + " is locked. " +
"Please contact your administrator to unlock it.");
}
// ... catch more exceptions here (maybe custom ones specific to your application?
catch (AuthenticationException ae) {
//unexpected condition? error?
}
}

//say who they are:
//print their identifying principal (in this case, a username):
// 获取当事人。。 这个例子就是username
log.info("User [" + currentUser.getPrincipal() + "] logged in successfully.");

//test a role:
// 测试角色
if (currentUser.hasRole("schwartz")) {
log.info("May the Schwartz be with you!");
} else {
log.info("Hello, mere mortal.");
}

//test a typed permission (not instance-level)
// 测试权限,不是实例级别
if (currentUser.isPermitted("lightsaber:wield")) {
log.info("You may use a lightsaber ring. Use it wisely.");
} else {
log.info("Sorry, lightsaber rings are for schwartz masters only.");
}

//a (very powerful) Instance Level permission:
// 实例级别
if (currentUser.isPermitted("winnebago:drive:eagle5")) {
log.info("You are permitted to 'drive' the winnebago with license plate (id) 'eagle5'. " +
"Here are the keys - have fun!");
} else {
log.info("Sorry, you aren't allowed to drive the 'eagle5' winnebago!");
}

//all done - log out!
// 退出
currentUser.logout();

System.exit(0);
}
}

配置文件 shiro.ini编写

1
2
3
4
5
6
7
8
9
10
11
12
13
14
15
16
17
18
19
# -----------------------------------------------------------------------------
# Users and their (optional) assigned roles
# username = password, role1, role2, ..., roleN
# -----------------------------------------------------------------------------
[users]
root = secret, admin
guest = guest, guest
presidentskroob = 12345, president
darkhelmet = ludicrousspeed, darklord, schwartz
aihe = aihe, goodguy, client

# -----------------------------------------------------------------------------
# Roles with assigned permissions
# roleName = perm1, perm2, ..., permN
# -----------------------------------------------------------------------------
[roles]
admin = *
client = look:*
goodguy = winnebago:drive:eagle5

springboot集成shrio

  1. 定义自定的Realm: 重写supports、doGetAuthorizationInfo(AuthenticationToken auth)->AuthenticatingRealm【默认使用此方法进行用户名正确与否验证】、doGetAuthorizationInfo(PrincipalCollection principals) ->AuthorizingRealm 【检测用户权限的时候调用】 : 返回值都为AuthorizationInfo
  2. 自定义Shrio过滤器集: preHandle -> isAccessAllowed -> executeLogin ->
  3. 配置ShiroConfiguration: 创建DefaultWebSecurityManager、ShiroFilterFactoryBean这两个类型的Bean
  4. (可选):定义自己的AuthenticationToken, 如JWTToken
  5. 在相应的接口上控制权限:注解声明式:@RequiresAuthentication、@RequiresRoles(“admin”)、@RequiresPermissions(logical = Logical.AND, value = {“view”, “edit”})、或者代码编程式:Subject subject = SecurityUtils.getSubject(); if (subject.isAuthenticated())

认证执行过程如下:

executeLogin函数中的getSubject(request, response).login(token);会调用this.securityManager.login(this, token);从而触发认证器管理器AuthenticatingSecurityManager找到认证器ModularRealmAuthenticator执行this.authenticator.authenticate(token);从而调度注册this.doSingleRealmAuthentication((Realm)realms.iterator().next(), authenticationToken)的Realm去完成认证工作:先判断当前realm是否支持解析当前出传入的AuthenticationToken,符合则调用AuthenticationInfo info = realm.getAuthenticationInfo(token);进行校验 ->(AuthenticatingRealm:我们Realm继承的类) 从而调用了我们自定义重写的doGetAuthenticationInfo(AuthenticationToken auth)方法info = this.doGetAuthenticationInfo(token);

image-20210818165636848

如何使用JWT做校验的流程:

  • 在LoginController中如果用户登陆成功则返回JWT信息。
  • 用户访问被Shrio过滤器注册的URL,则通过过滤器中执行的preHandler(设置请求头)->onHandler中会执行isAccessAllowed(规定如何通行)从而调用真正的认证判定函数executeLogin其中会调用Realm来进行login的判断(如果没有异常则表示通过)

详细的代码实践教程: https://github.com/Smith-Cruise/Spring-Boot-Shiro

Author: Mrli

Link: https://nymrli.top/2021/08/11/Shiro使用学习/

Copyright: All articles in this blog are licensed under CC BY-NC-SA 3.0 unless stating additionally.

< PreviousPost
JWT使用学习
NextPost >
Chrome插件编写-天猫秒杀插件
CATALOG
  1. 1. Shiro 的架构
  2. 2. Realm
  3. 3. 身份验证
    1. 3.1. 身份认证流程
  4. 4. 授权
  • 附录
    1. 1. 官方十分钟教程-独立程序篇
    2. 2. springboot集成shrio
    3. 3. 如何使用JWT做校验的流程: